Take your first step with Dapr
Dapr is a new way to build distributed applications. It provides quite a few building blocks to abstract the common operations of distributed microservice architecture. In this article, let us take the first step with Dapr and understand how it works.
What is Dapr?
Dapr is not a framework or a library. It is a runtime. Dapr is language-agnostic. Before we explain what Dapr is, let us look at what problem Dapr can solve, then understand how it works.
What problem Dapr can solve?
Now everyone is talking about cloud-native, microservice and distributed systems. More and more companies and organizations are refactoring their monolithic systems to microservice architecture. Another trend is that we have more and more cloud services/components to build the application, like Lego bricks, so as a developer, we need to learn how to use these cloud-native services to build the application. For example, if you need a state store, you can use Azure CosmonDB or AWS DynamoDB, or you can use Redis managed by any cloud provider. If you need a message queue, you can also find some managed services in the cloud. So we need to make decisions like:
- Which one will we use?
- How should we write the code?
- How do we integrate these cloud services with our application?
- What if we want to use another platform? How can we reuse our code?
If you write code that targets a specific cloud provider, that means your application will be tightly coupled with that cloud provider, and you cannot easily migrate to another cloud platform. It’s not portable. It’s a vendor-locking risk.
Let’s say we want to implement a state store for the shopping cart service. That’s a quite common feature in all online shopping systems. We have many available options:
- Redis
- Memcached
- MongoDB
- Azure CosmosDB
- Azure Table Storage
- AWS DynamoDB
- GCP Firestore
Let’s say the client has an existing solution in Azure, so we decide to use CosmosDB as the state store. Then we probably would make it like this:
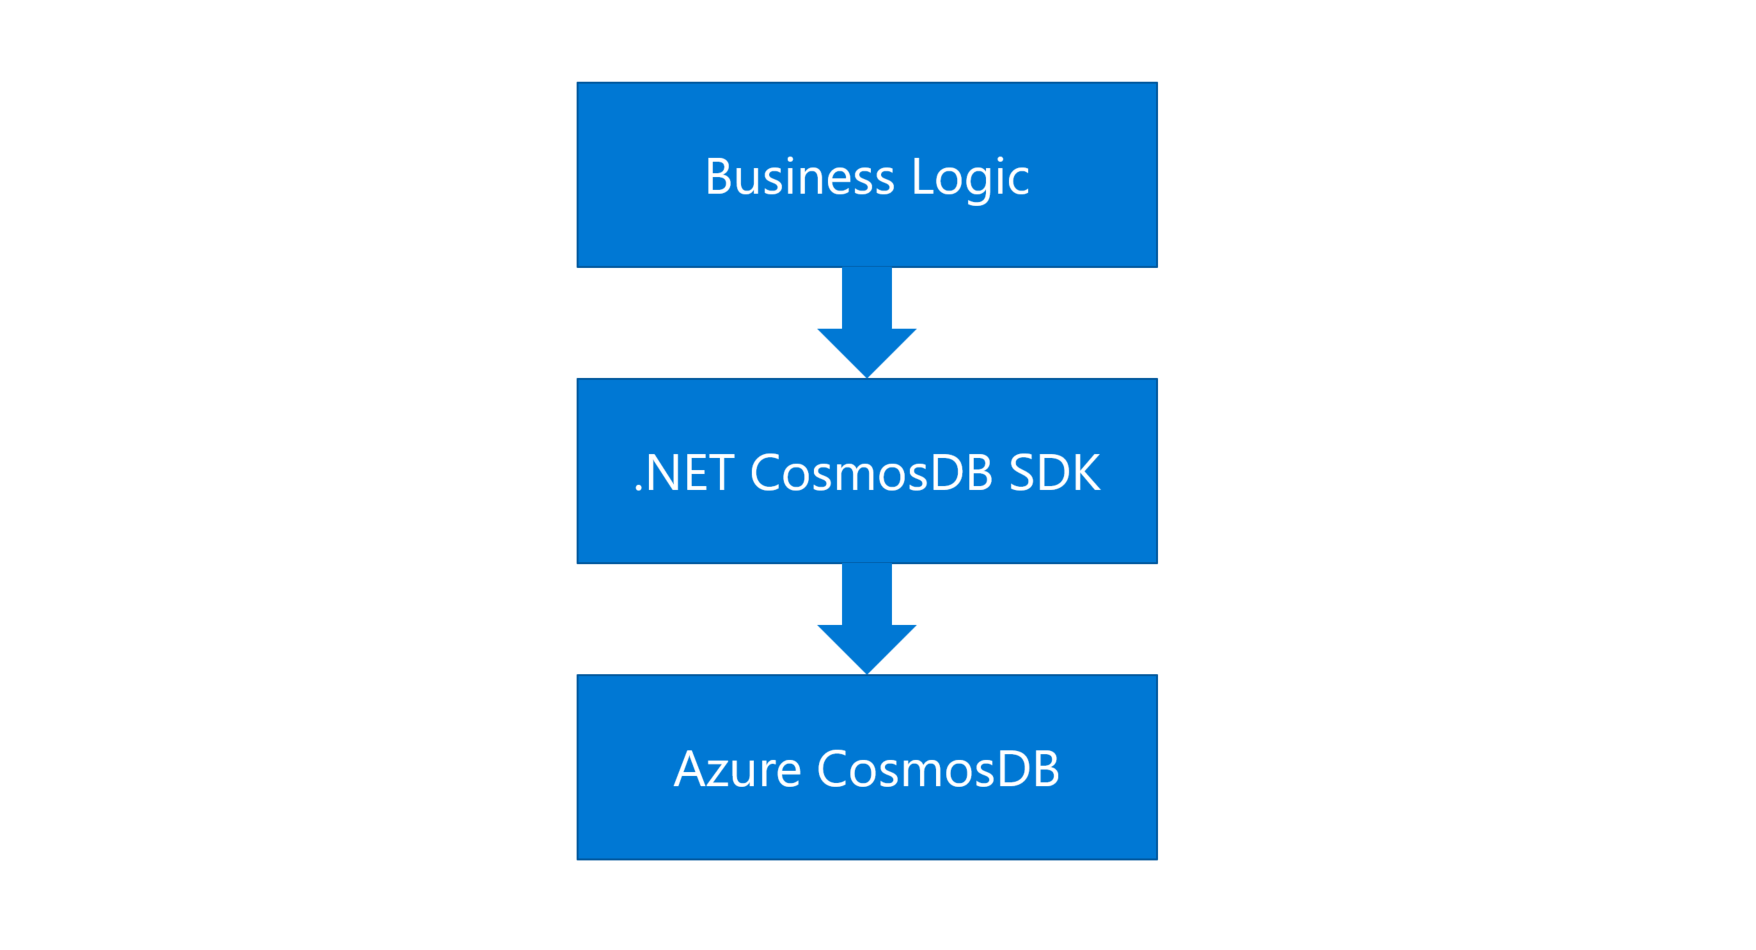
Figure 1 - The traditional project structure
First, we would need to learn how to use CosmosDB, read the documentation, and install the CosmosDB SDK for a specific language. If the project is developed by .NET, I’ll install the .NET CosmosDB SDK, then I can write the business logic code on top of it. This is quite straightforward.
The challenge is that we may want to implement the hybrid cloud architecture, or we need to support on-premises or AWS. So we will need to implement the state store on Redis or AWS DynamoDB. But how can we reuse our code?
If you are an experienced developer, you would say “hey we can use some design patterns, like Dependency Injection”. That’s true. Dependency Injection is a common pattern to inject the correct implementation for a specific purpose. We can define an interface to make an abstraction for the common operations, then we can have different implementations, one for CosmosDB, and another for Redis, as shown below:
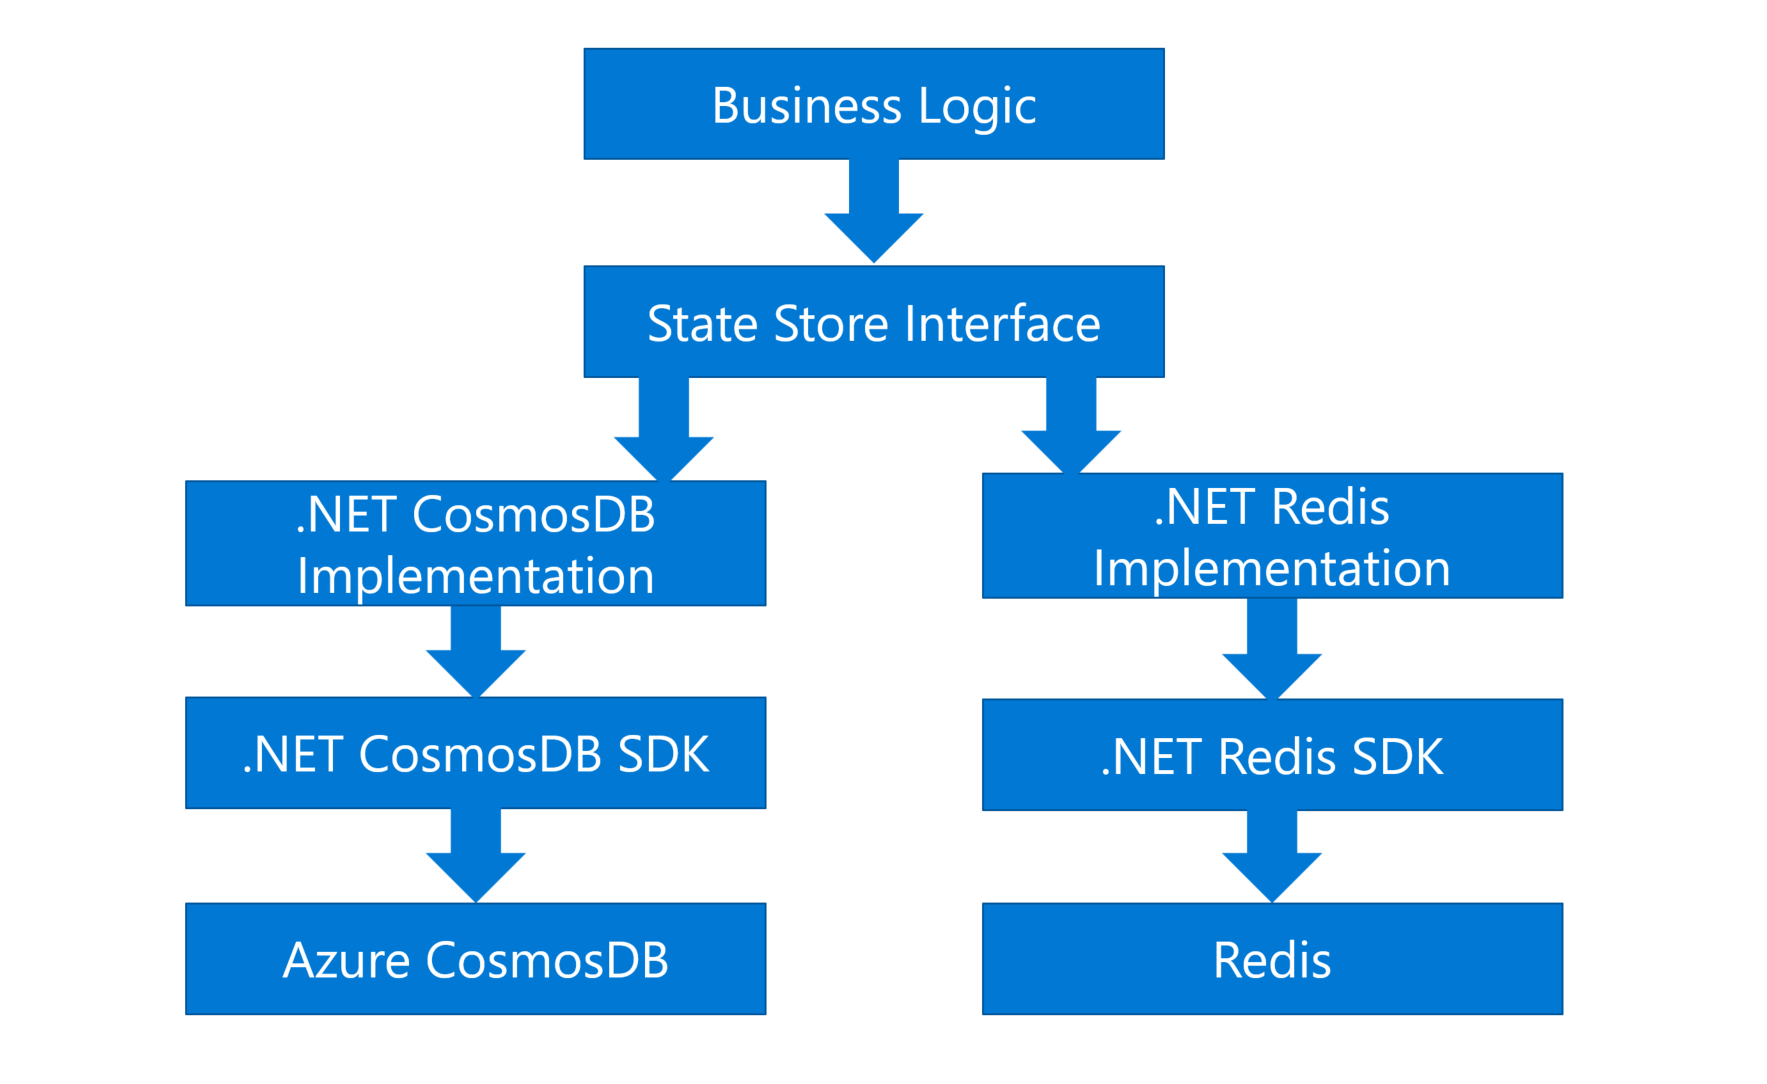
Figure 2 - Using Dependency Injection to support multiple implementations
Ok now it supports two platforms. What if we need to support more? Apparently, we need to write more code with different SDKs for each platform. It works but you will find many duplicated codes. That’s a problem.
There’s a principle in software development called the DRY principle – Don’t repeat yourself. As developers, we don’t want to repeat ourselves. We want to write the code once and reuse it. So we need to find a better way to solve this problem.
That’s the challenge for developers. The reality is that, to be a modern application developer, we need to understand many services in each cloud provider. But we want to focus on business logic only, and lean on the cloud platforms to implement the scalability, flexibility, resiliency, maintainability, elasticity, etc. Developers should not be expected to become distributed system experts.
How can we solve that? How can we write the code once and run it everywhere? How can we reduce the cognitive load to support more platforms? How can we have agility and flexibility, and reduce the complexity?
That brings us to Dapr, or distributed application runtime, which is a new way to build modern distributed applications. Let’s see what we can do if we use Dapr to build the same application.
What if we use Dapr?
If we use Dapr for the same shopping cart service, we can refactor the system like this:
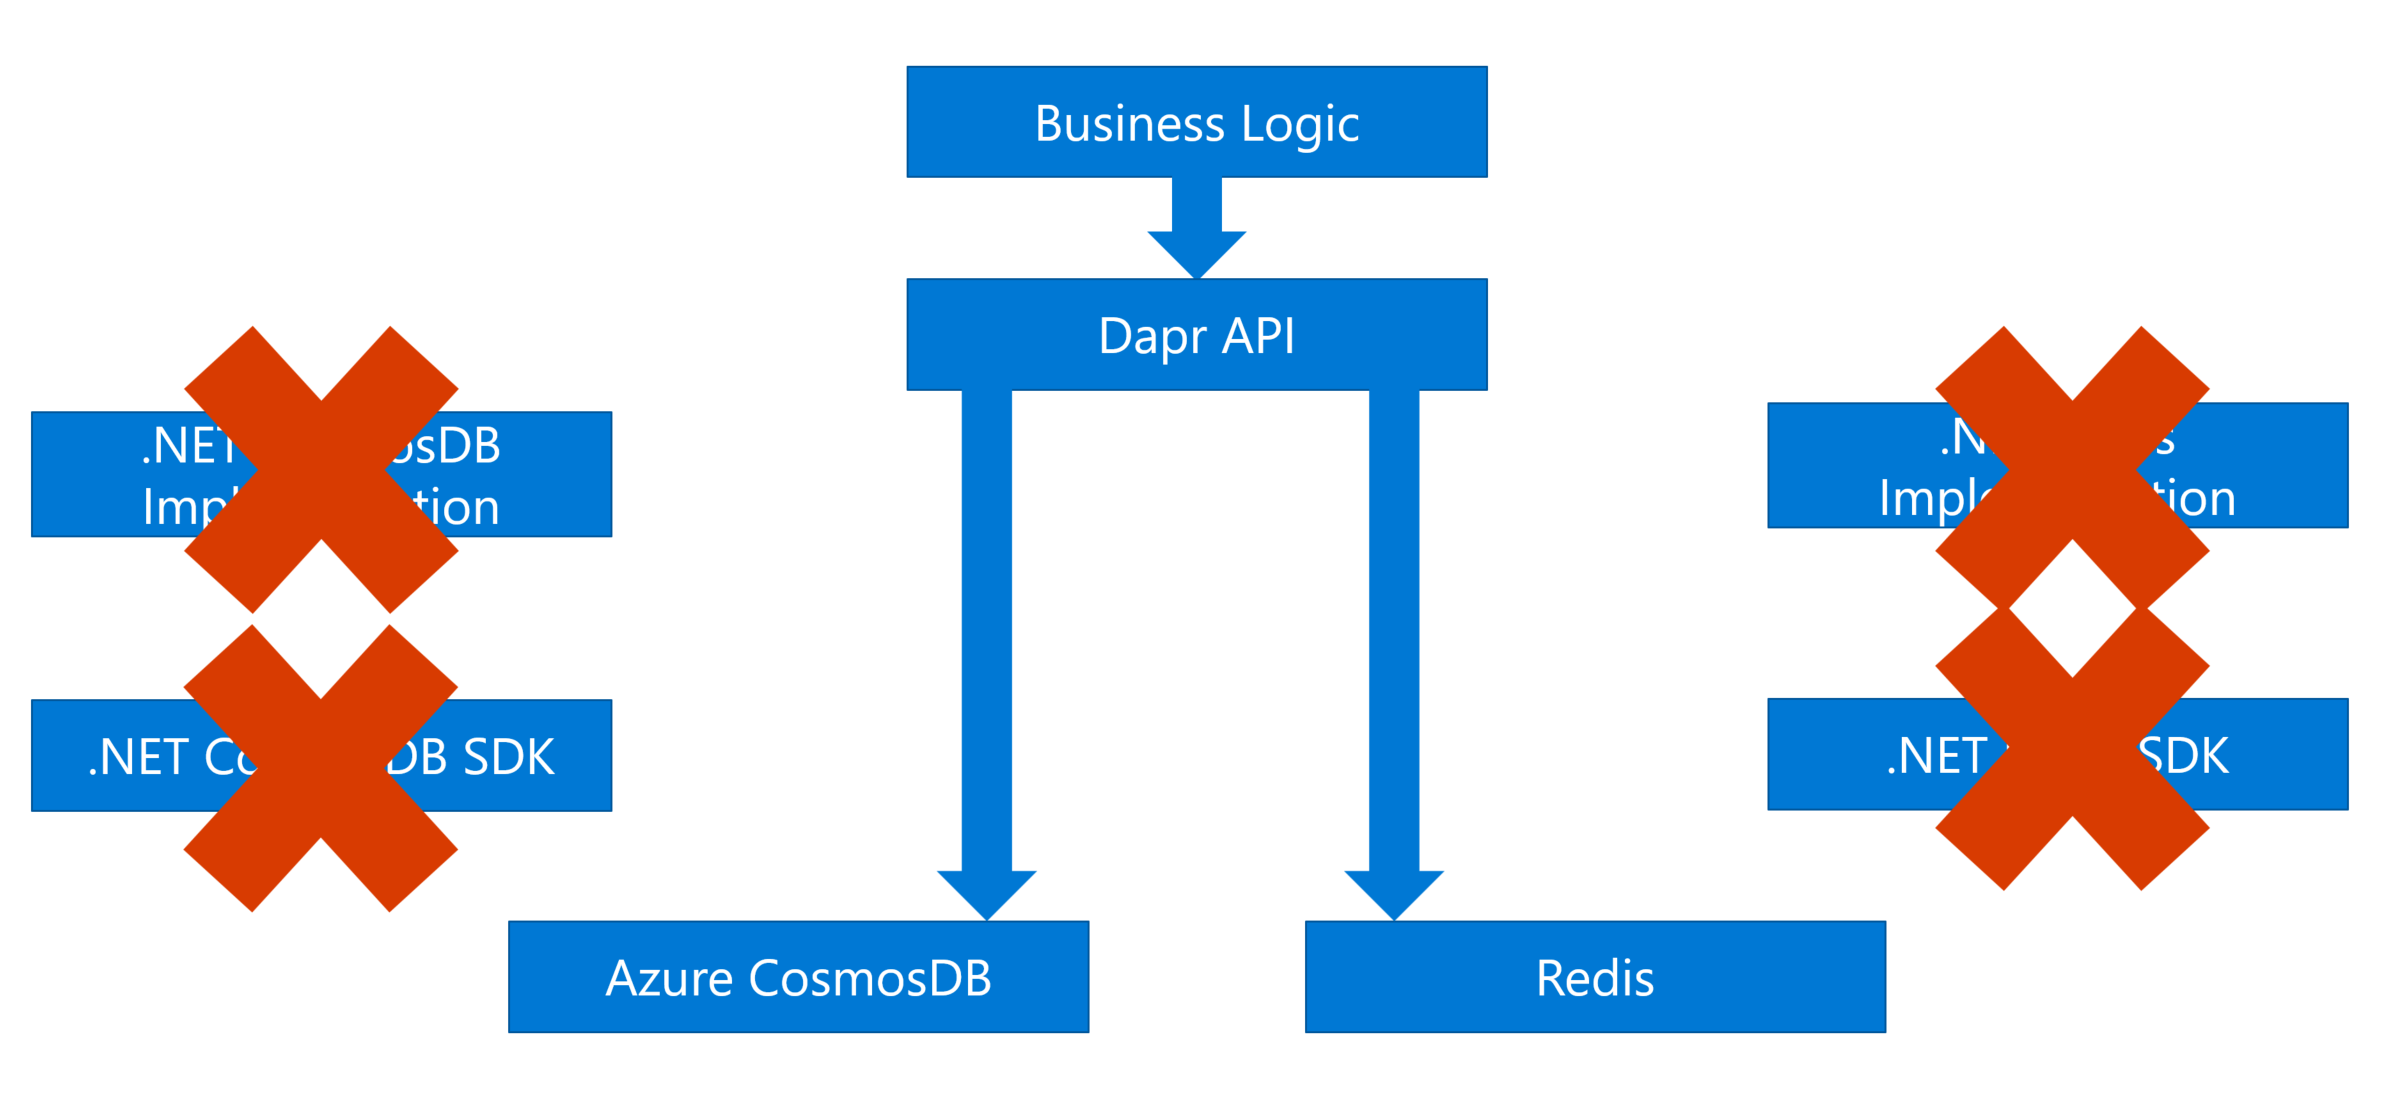
Figure 3 - Refactoring the shopping cart service with Dapr
We don’t need to install any language-specific SDKs. We just call the standard APIs exposed by Dapr, and Dapr will call the underlying cloud services. In other words, Dapr is like an interface, or an abstraction layer between our application and the cloud services, which can reduce the complexity. If we want to support more cloud services, no need to change the code, just update the configuration file of Dapr.
That says, the application now is portable. You can easily run it on any cloud platform. Also, the code is simpler, shorter, and easier to manage. Ok the state management is just one feature of Dapr. Next, let’s dive deeper and check more details.
Dapr is trying to solve the complexity of building a distributed application. Here is the overview of the Dapr architecture.
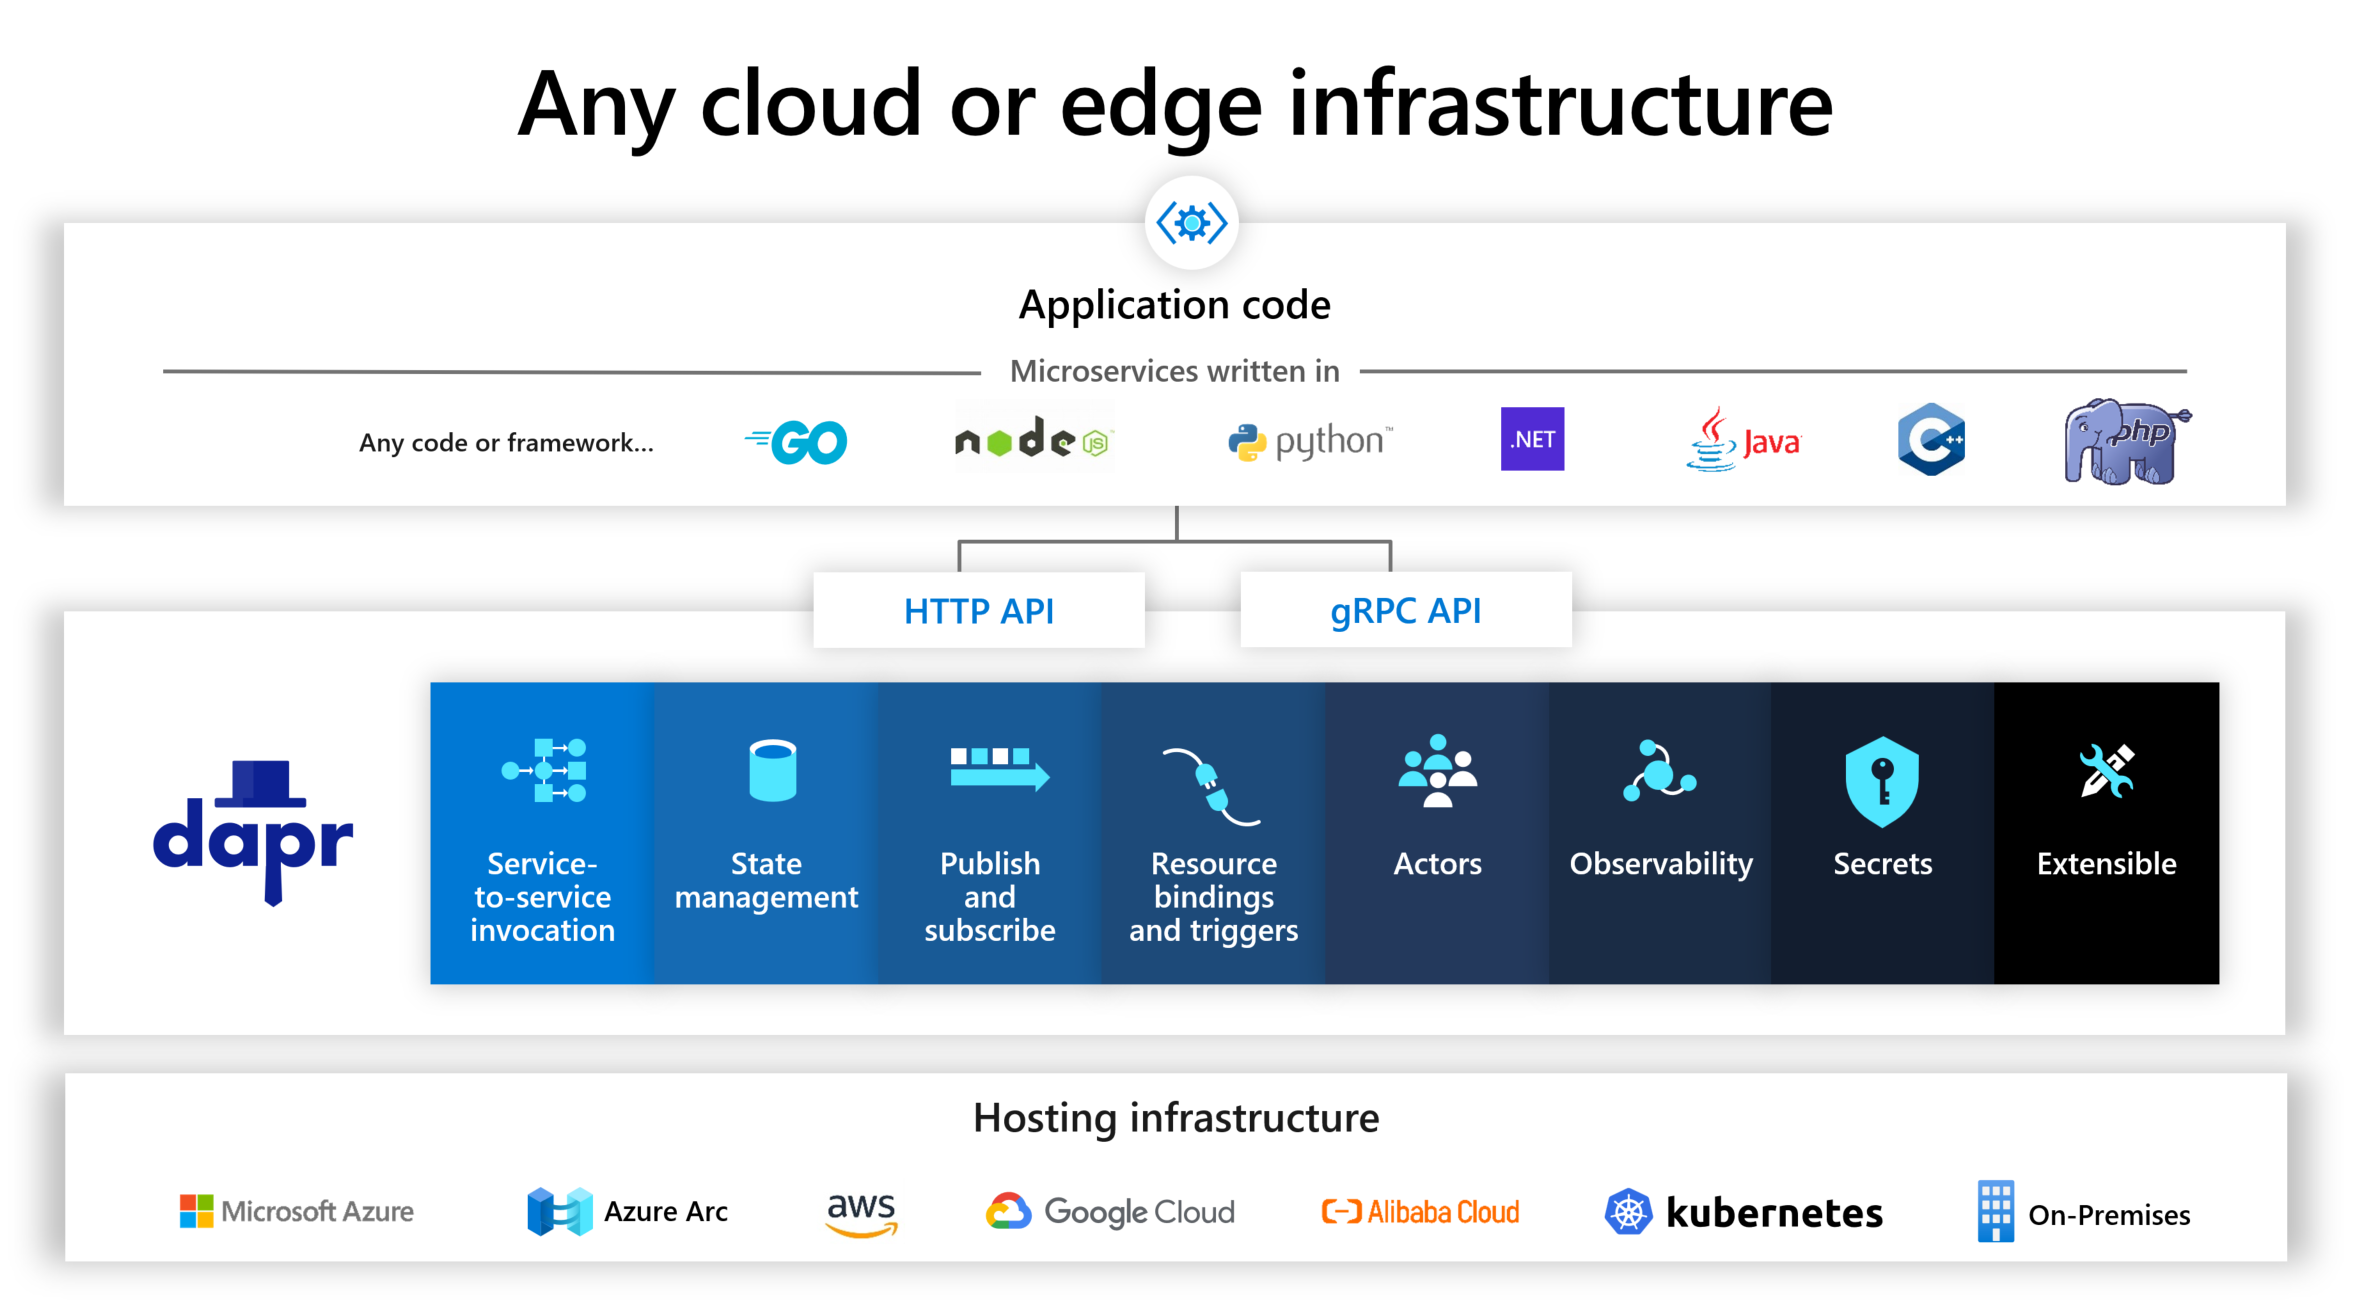
Figure 4 - The overview of Dapr (Copyright by Microsoft)
We can see, on the bottom row, there are various cloud providers. In the blue area, there are some building blocks of Dapr.
What is a building block?
A building block is an abstraction layer for a specific cloud capability, or we can say it encapsulates a distributed infrastructure capability. For example, the state management capability we just mentioned in the shopping cart example, you can use Azure CosmosDB, or AWS DynamoDB, but both of them are NoSQL databases, and they have lots of similarities. So on top of them, Dapr provides a building block to make the abstraction for this capability. Then We can access the capability through the Dapr APIs, normally they are HTTP or gRPC APIs.
On top of the Dapr building blocks, there is our application code, you might use various languages, like Python, .NET, or NodeJS. It doesn’t matter. Because they will call the Dapr APIs without any hard dependencies to those cloud services.
You can see besides the state management, there are some other building blocks for Service-to-service invocation, pub/sub, bindings, actors, observability, secrets, etc. Each building block represents a capability of the distributed application based on the cloud-native services.
We won’t introduce each of them in this article, but we can understand that Dapr allows you to swap out different underlying implementations without having to change any code. So this way makes your code more portable, more flexible, and vendor-neutral.
How it works?
This diagram below shows the Dapr architecture, which is called sidecar architecture.

Figure 5 - A Sidecar
Dapr is like a sidecar that you can assemble with your motorcycle. A sidecar enables Dapr to run in a separate process or a separate container alongside the service. For each service, you can have a Dapr sidecar. In this way, Dapr will not intrude on your application, and it would be easy to change the code to adopt it.
The service calls the Dapr APIs through HTTP or gRPC. And the Dapr building blocks invoke the components that implement the cloud services.
What is a component?
A component is to provide concrete implementation for the cloud services. If we use a simple analogy, a Building block is like an interface, and a component is like a concrete implementation.
The application doesn’t know how Dapr calls those components. It just needs to know Dapr building blocks. No dependencies on cloud services. The building blocks are independent of each other. You can use one of them or use many of them. Just do it following your requirements. Another benefit is that Dapr is developed in the industry best practices including comprehensive observability. So you can confidently use these building blocks to build your distributed application.
Dapr has a set of components for many popular services. For state stores, we can see it supports DynamoDB, CosmosDB, Firebase, Redis, etc.
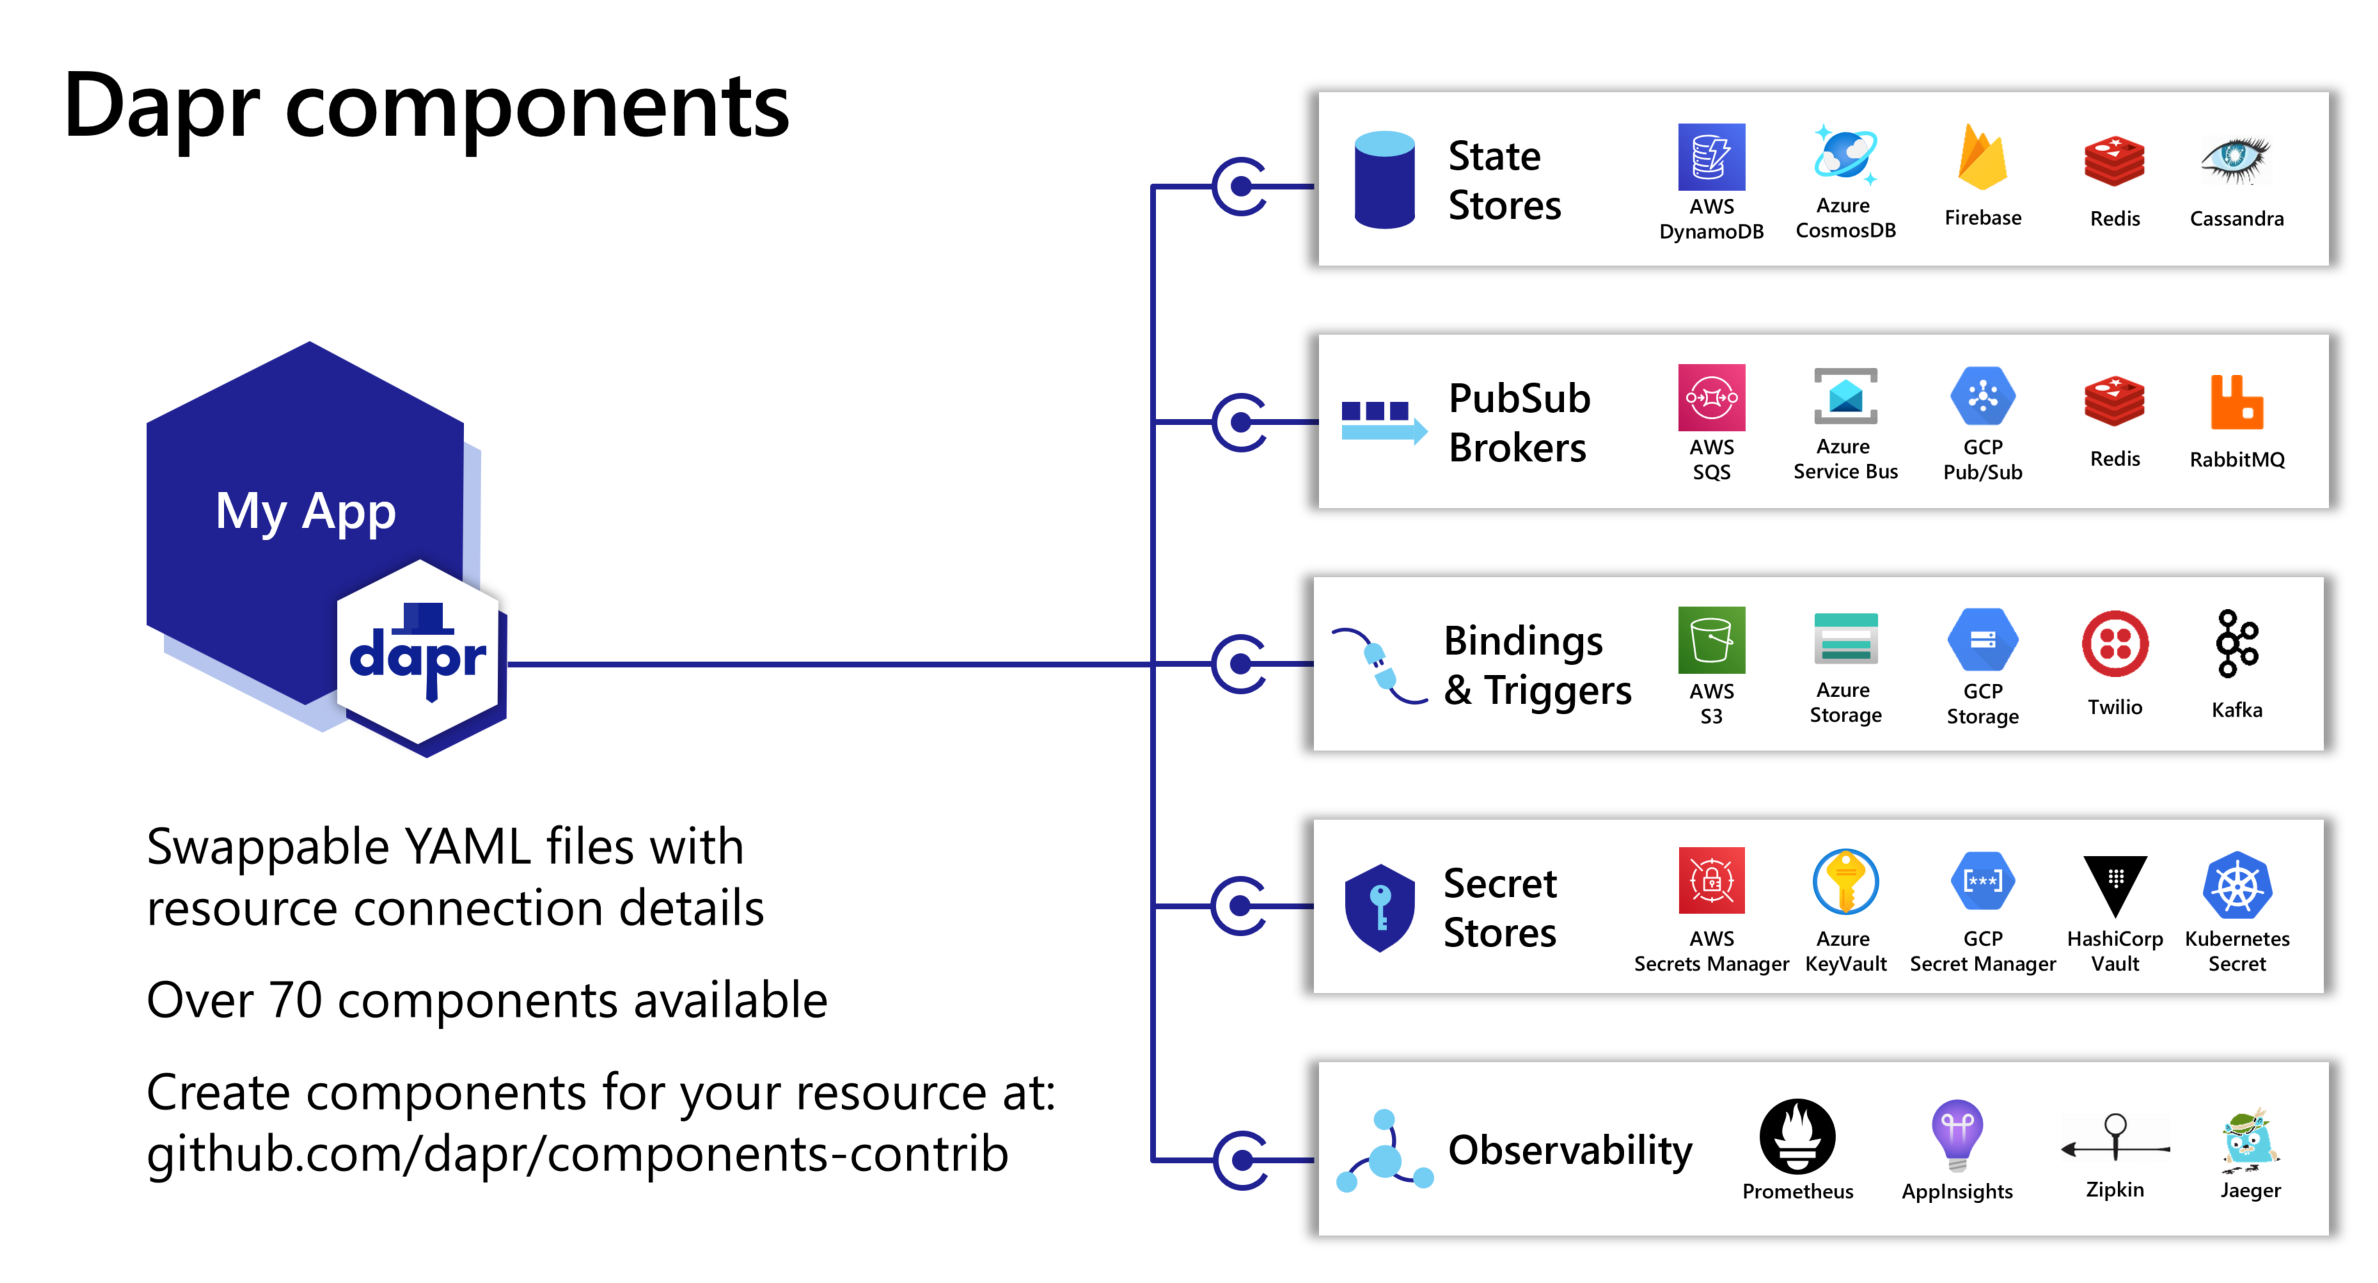
Figure 6 - Dapr components (Copyright by Microsoft)
Similarly, the other building blocks also have many components. There are over 70 components available now. So if you need to support another service, you can just update the Dapr configuration to support that. No need to change the code.
Also, Dapr is an open-source project, so everyone can create components for any resources and contribute the code.
Next, let’s see a demo. I will show you how to use the state store component in Dapr.
Prerequisites
Microsoft provides a getting-started guide here: https://docs.microsoft.com/en-us/dotnet/architecture/dapr-for-net-developers/getting-started. We will follow the steps below:
Install Dapr
- Install the Dapr CLI.
- Install Docker Desktop. If you’re running on Windows, make sure that Docker Desktop for Windows is configured to use Linux containers.
- Initialize Dapr in your local environment.
- Install the .NET 6 SDK.
After you initialize Dapr, you can run the command docker ps to verify containers are running. You can see a Redis instance named dapr_redis in the output, which is the default state store implementation by default:
1 | CONTAINER ID IMAGE COMMAND CREATED STATUS PORTS NAMES |
Let’s see how to use this built-in state store.
Building the first Dapr application
We will build a simple console app to consume the default state store.
Creating the application
This demo comes from Microsoft’s doc: Get started with Dapr. I’ll introduce the main steps below:
Run the below command to create a console application:
1 | dotnet new console -o DaprCounter |
Navigate to the application directory:
1 | cd DaprCounter |
Run the command below, you should be able to see the output as “Hello World!”
1 | dotnet run |
Adding Dapr State Management
We will use the Dapr SDK to access the state store. We mentioned that Dapr provides HTTP/gRPC protocols so you can call the Dapr APIs using any tool. Using the Dapr SDK would save our effort by providing the strongly typed .NET client to call the Dapr APIs.
Run the command below to install the Dapr.Client NuGet package:
1 | dotnet add package Dapr.Client |
Open the Program.cs file and update it as the following code:
1 | using Dapr.Client; |
In this file, we create a DaprClient instance, which is used to call the Dapr APIs. To use the state store, we use GetStateAsync() and SaveStateAsync() to get and save the counter value.
Running the Dapr application
Run the application with the following command:
1 | dapr run --app-id DaprCounter dotnet run |
In the command above, we specify the app-id for the application. The state store will use this id as a prefix for the state key. You will see the counter increases per second.
Stop and restart the application. You will see the counter does not reset, which means the value is saved in the state store.
If you want to check the data in the Redis container, you can inspect it in the terminal:
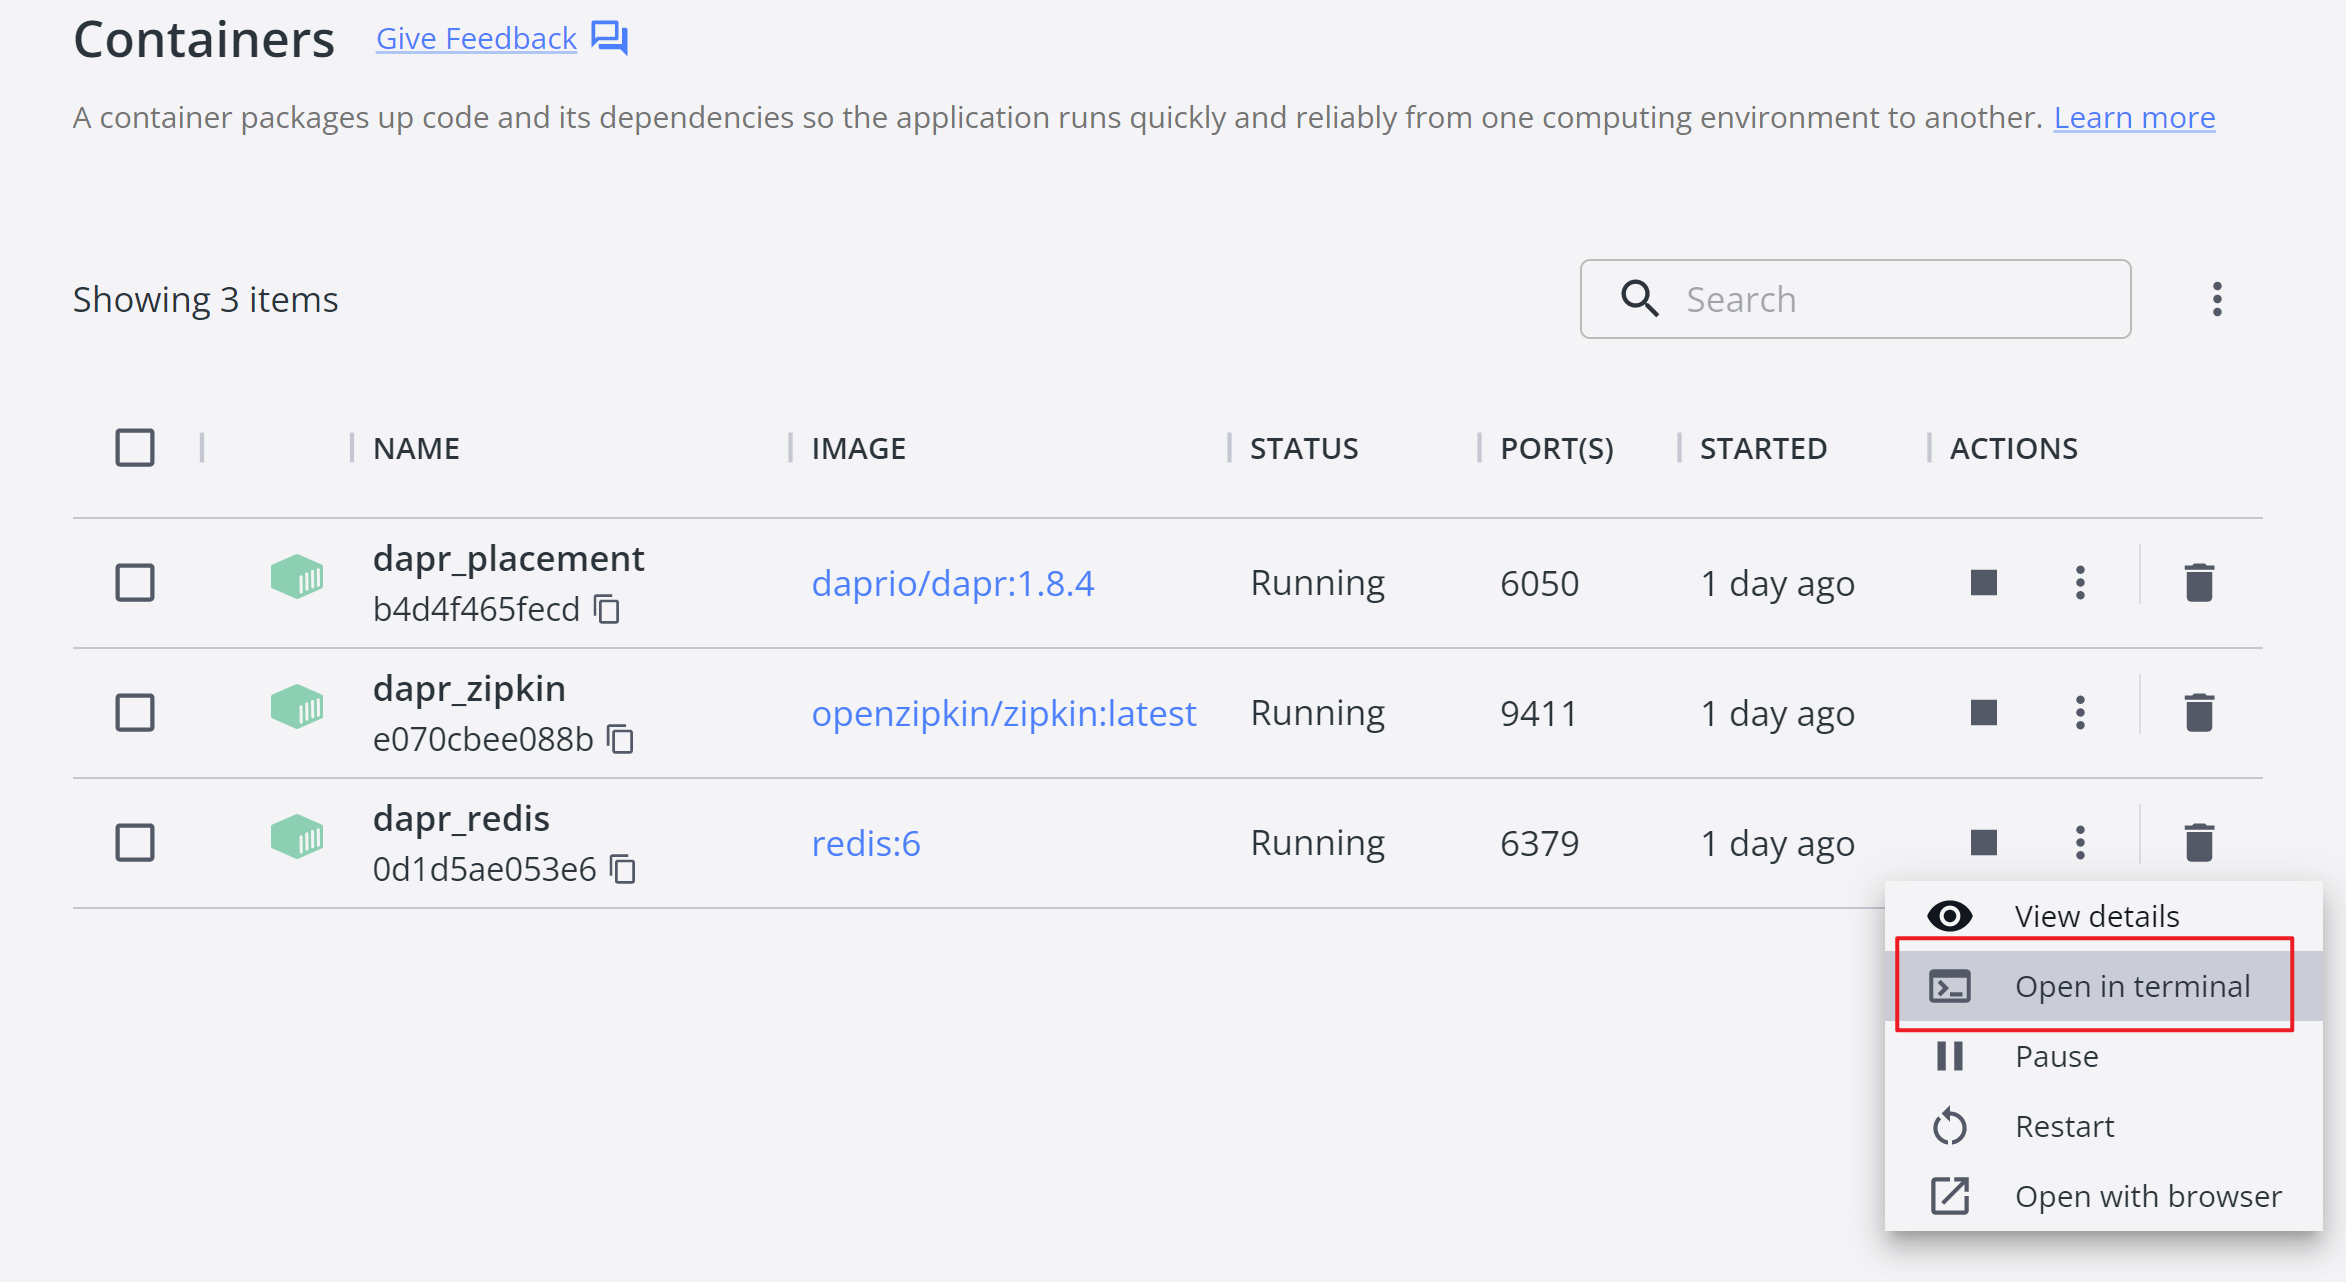
Figure 7 - Inspect the Redis data in terminal
Then use the following command to enter Redis-CLI:
1 | redis-cli |
Then you can check the keys in the Redis database:
1 | 127.0.0.1:6379> Keys * |
You will see the key consists of the app-id and the key name that is defined in the code.
To check the data stored in the database, you can use the command below:
1 | 127.0.0.1:6379> HGETALL DaprCounter||counter |
To delete the key, use the command below:
1 | 127.0.0.1:6379> DEL DaprCounter||counter |
In this project, we do not have any dependency on Redis directly. Dapr SDK behaves as an abstraction layer between the application and the Redis instance. So the next question is, how does Dapr know where the Redis instance is?
Understanding the component configuration files
As we mentioned before, when you initialize Dapr for the local environment, it automatically created a Redis instance as its state store. Also, it created a configuration file to specify what component is used for the state store. The default configuration files are located in the %USERPROFILE%\.dapr\components folder if you use Windows. If you use Linux or macOS, you can find them in the $HOME/.dapr/components folder. You can find a file named statestore.yaml:
1 | apiVersion: dapr.io/v1alpha1 |
In this file, Dapr specifies the state type as Redis. It also has the metadata to specify the Redis host and password. If we would like to change to another implementation of the state store, e.g. an Azure CosmosDB, we just update the configuration file without changing any code of the application. That says the application is portable.
Microsoft’s doc does not introduce how to switch to another implementation. Let’s move on.
Using Azure CosmosDB as the state store
Next, let us explore how to change the state store to Azure CosmosDB.
Creating an Azure CosmosDB database
Follow this doc to create the Azure CosmosDB database: Quickstart: Create an Azure Cosmos account, database, container, and items from the Azure portal.
Create a CosmosDB account. Here are examples when you create the CosmosDB account:
- API: Core (SQL)
- Resource Group:
rg-dapr-demo - Account Name:
dapr-demo - Location: Select a location that is close to you
Leave the other fields as default values.
Create a CosmosDB container:
- Database id: Create new,
dapr-demo - Container id:
dapr-state-store - Partition key:
/id
Leave the other options to their defaults.
Once the CosmosDB container is created, you can get the URI and Keys in the Settings menu:
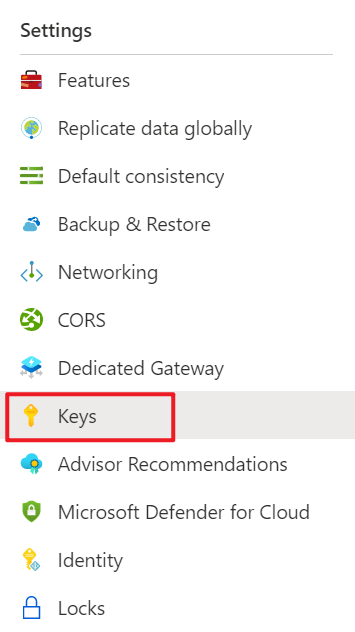
Figure 8 - The Keys menu of CosmosDB
Copy the URI and the PRIMARY KEY, and we will use them in the next section.
Using Azure CosmosDB
Next, let us update the statestore.yaml file to use the Azure CosmosDB. You can make a backup for the default configuration. Then update the file as the following content:
1 | apiVersion: dapr.io/v1alpha1 |
Run the below script again:
1 | dapr run --app-id DaprCounter dotnet run |
You will see the application works too. But the counter is reset because it now uses the Azure CosmosDB as the state store. The implementation of the state store is pluggable!
Managing the secrets in Dapr
In the above config file, the secret is stored in plain text. It is not a good practice to store the secret in the configuration file. Dapr provides a secret management building block to manage the secrets. You can use it to store the secret and reference it in the configuration file.
The secret management building block is pluggable too. It supports multiple components for managing secrets. You can use the local file, Azure Key Vault, AWS Secrets Manager, etc. In this demo, we will use an Azure Key Vault as the secret store.
Creating an Azure Key Vault
Follow this guide to create your Azure Key Vault: Quickstart: Create a key vault using the Azure portal.
- Resource group:
rg-dapr-demo - Key vault name:
dapr-demo - Region: Select a region that is close to you
- Pricing tier: Standard
Leave the other options to their defaults.
Storing the secret in the Azure Key Vault
In the Azure Key Vault, click Secrets in the Objects menu, create a secret named dapr-state-store-key and set the value to the PRIMARY KEY of your CosmosDB container.
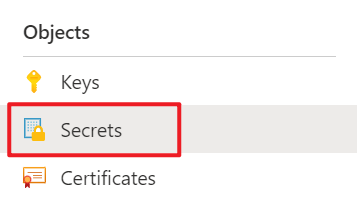
Figure 9 - The Secrets menu of Azure Key Vault
Authenticating the application to the Azure Key Vault
Next, we will need to authenticate the Dapr components to the Azure Key Vault. Azure uses Azure AD as the identity and access management solution. It allows services (applications) to obtain access tokens to call other services, e.g. Azure Key Vault. In Azure terminology, an application is called a Service Principal.
To use Azure AD to authenticate the Dapr components, there are multiple ways:
- Authenticating using client credentials
- Authenticating using a PFX certificate
- Authenticating using a managed identity
Because we run the demo locally, we will use the client credentials to authenticate the Dapr components. You can use PFX certificate or managed identity for production environment.
Generating a new Azure AD application and service principal
Go to the Azure Portal and click the Cloud Shell icon on the top menu:

Figure 10 - Azure Cloud Shell
If you use your local terminal, you may need to login to Azure by running the following command:
1 | az login |
If you have multiple subscriptions, run the following command to set your default subscription:
1 | az account set -s [your subscription id] |
Create an Azure AD application:
1 | APP_NAME="dapr-application" |
Create a client secrete for the application:
1 | az ad app credential reset \ |
This command will generate a client secret for the application. It will also print some other values in the output. Copy the values below and save them in a safe place. You will need it in the next section.
- appId: The client id
- name: The client name
- password: The client secret
- tenant: The Azure AD tenant id
Next, create a service principal for the application:
1 | SERVICE_PRINCIPAL_ID=$(az ad sp create \ |
You will see a service principal ID in the output. Copy it and save it in a safe place. You will need it in the next section.
Now you have two Ids, the application Id and the service principal Id. You might wonder what the difference is. The application Id (clientId) is used to represent the Dpar components. The service principal Id is used to grant permissions to an application to access Azure resources, e.g. Azure Key Vault.
When a service principal is created, it does not have any permissions. You need to grant permissions to the service principal to access Azure resources. In this demo, we will grant the service principal to access the Azure Key Vault.
Granting the service principal to access the Azure Key Vault
Go to the Azure portal and click the Azure Key Vault you created in the previous section. Click Access configuration in the Settings menu. Click Go to access Policies:
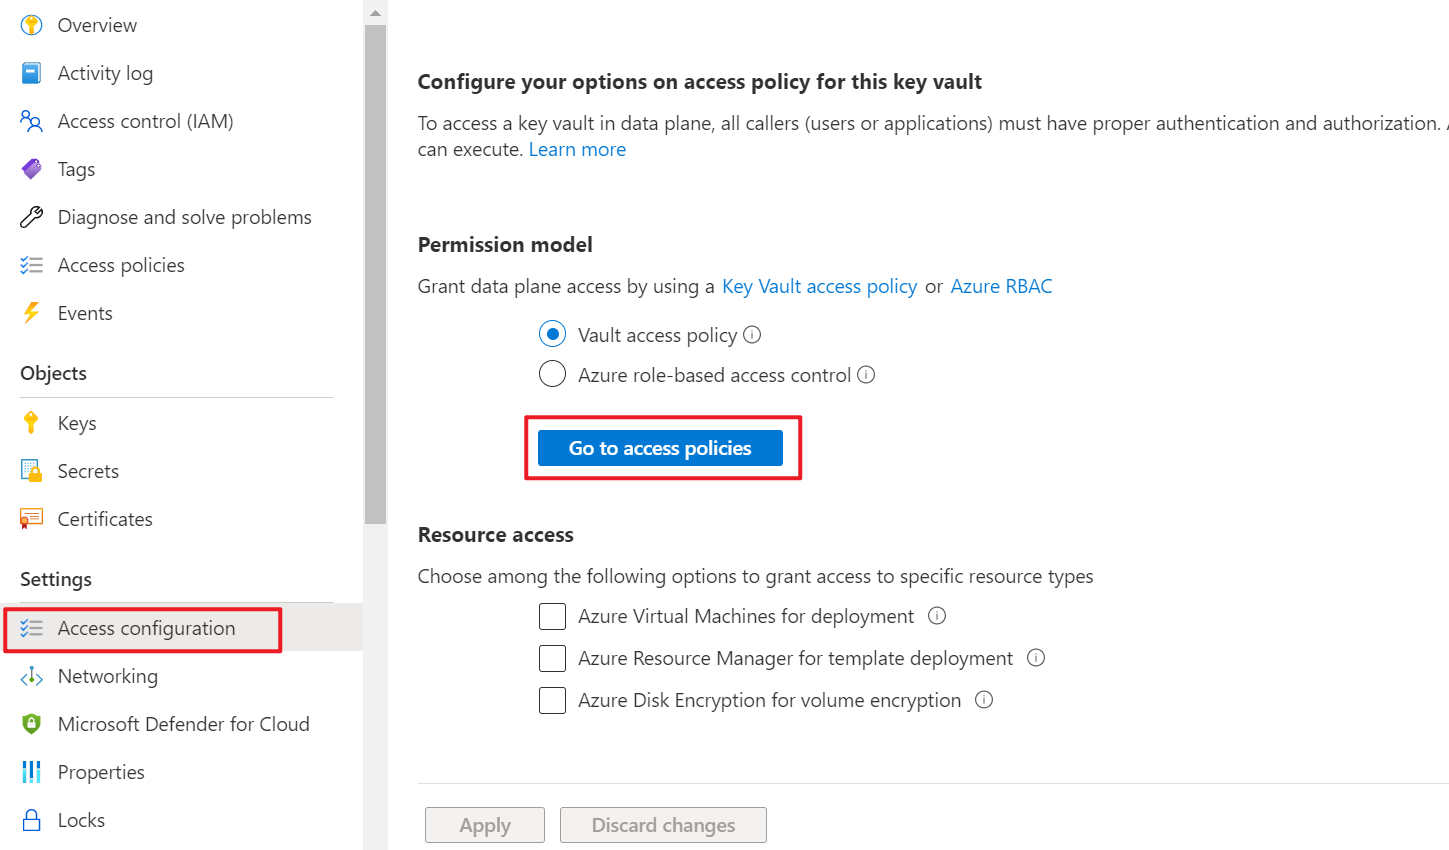
Figure 11 - Config Azure Key Vault Access Policies
Click Create to create a new access policy. On the first Permission tab, select Secret permissions and check Get:
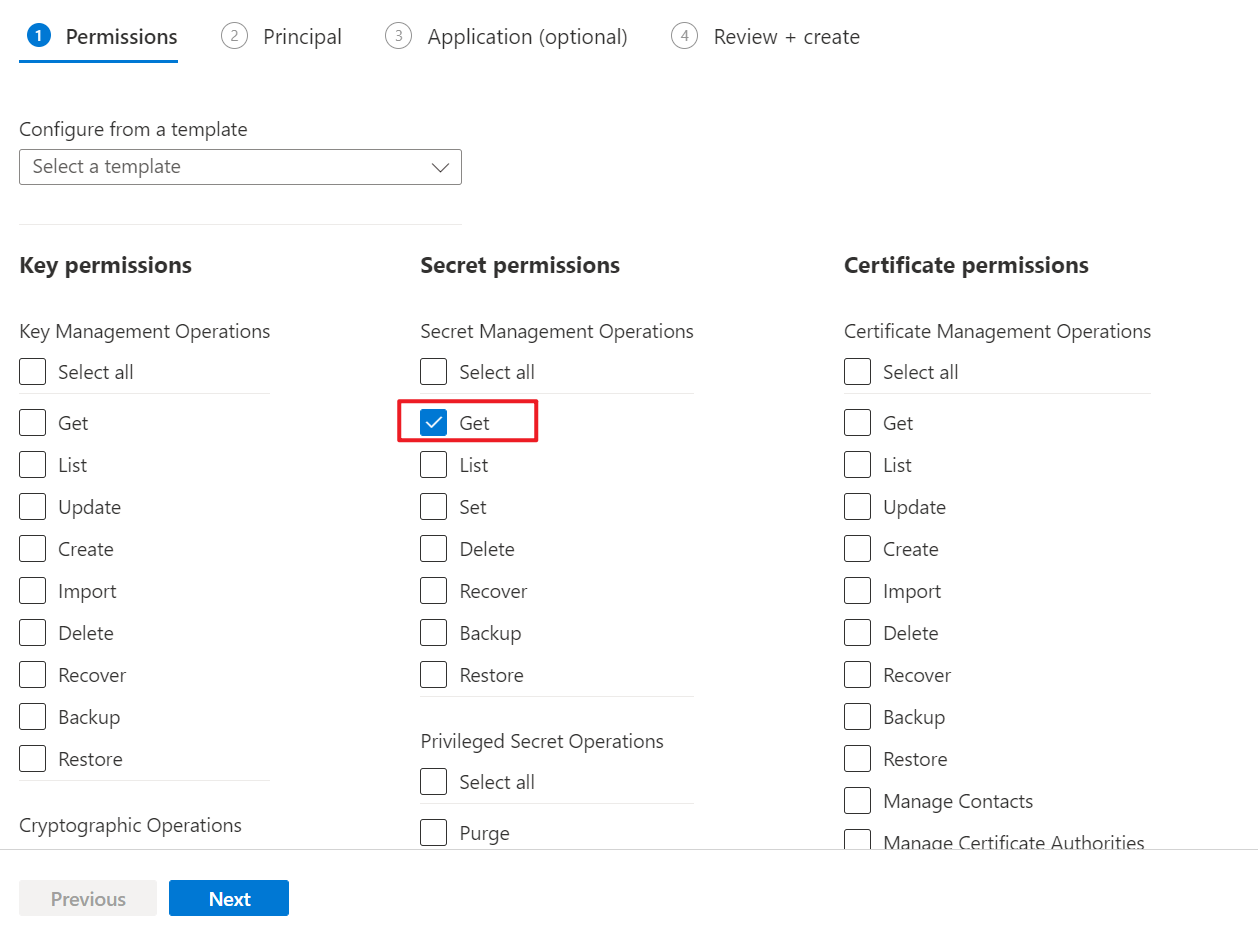
Figure 12 - Set up access permissions
On the second Principal tab, we can search for the service principal we created in the previous section:
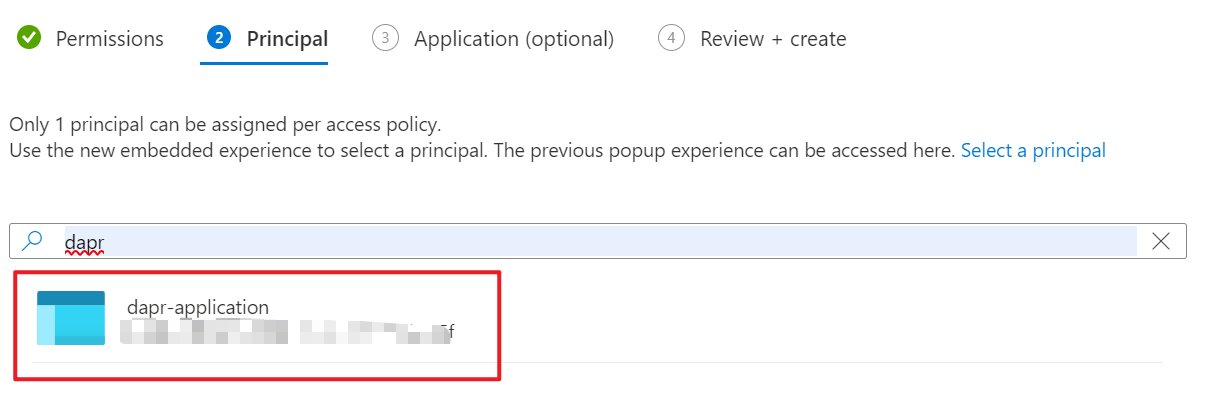
Figure 13 - Assign the service principal
Select the dapr-application and click Next. Then click Next again then click Create to create the access policy.
Creating a Dapr component to access the Azure Key Vault
Now we have a service principal that can access the Azure Key Vault. We need to update the configuration file to use the service principal to access the Azure Key Vault.
Create a new file named azurekeyvault.yaml in the dapr\components folder. Add the following content to the file:
1 | apiVersion: dapr.io/v1alpha1 |
Please replace the values of azureTenantId, azureClientId and azureClientSecret with the values you saved in the previous section:
- azureTenantId: tenant
- azureClientId: appId
- azureClientSecret: password
If you want to use a PFX certificate to authenticate the Dapr components, you can use the following component:
1 | apiVersion: dapr.io/v1alpha1 |
Now we have a Dapr secret store component that can access the Azure Key Vault. We can use this component to retrieve the secret we stored in the Azure Key Vault.
Using Dapr secret store to access the state store
The last step is to update the configuration file for the state store component to use the secret store component to access the Azure Key Vault.
Update the statestore.yaml file in the dapr\components folder as the following content:
1 | apiVersion: dapr.io/v1alpha1 |
Note that we use the secretKeyRef to replace the hard-coded master key with the secret store component. The secretStore is the name of the secret store component we created in the previous section. In this way, we remove the plain text master key from the configuration file so it would be safe to check in the configuration file to source control. The defect with this demo is that we still have a client secret in the configuration file. To remove the client secret from the configuration file, we can use a PFX certificate to authenticate the Dapr components. This demo is just to show how to use the secret store component to access the Azure Key Vault.
Now we can run the application to see if it can access the Azure Key Vault and the Cosmos DB. If everything works fine, you should see the application works as expected.
Summary
In this article, we learned what Dapr is and how to use Dapr to implement a portable state store, which can support Redis and Azure CosmosDB as the implementations. We also learned how to use Dapr to access the Azure Key Vault to retrieve the secret. Note that Dapr has many other components that can be used to build a portable application. To learn more about how to configure the other Dapr components, please check the Dapr documentation.
Thanks for reading!