Using Azure DevOps Pipelines to inject configurations for ASP.NET Core Web App for Containers
In part 1 of this article - Using Azure Devops Pipelines to inject configurations for Asp.Net Core Aeb App on linux, I used Azure DevOps to deploy my ASP.NET Core app to Azure Web App on Linux. The next part is to publish the same web app to Azure Web Apps for Containers. I do not need to re-emphasize the benefits of the container. You can find bunches of documents that promote it. So I just would like to show you how to leverage the Azure DevOps Pipelines to build the web app as docker images then push it to Azure Container Registry, then publish it to Azure Web Apps for Containers.
Adding the Docker support to the .NET Core Web App
I suppose you have Docker Desktop installed on your machine. If not, you can download it here. The below commands are necessary for your container journey:
1 | docker ps |
However, the docker command is not the key point of this article. You can find the documents here: Docker CLI. Actually, we do not need to build the docker image on our local machine. Instead, we will use Azure DevOps to build the docker image and publish it. Let’s get started.
The first step is adding the Docker support to the current .NET Core app. Right-click the project and select Add - Docker support…:
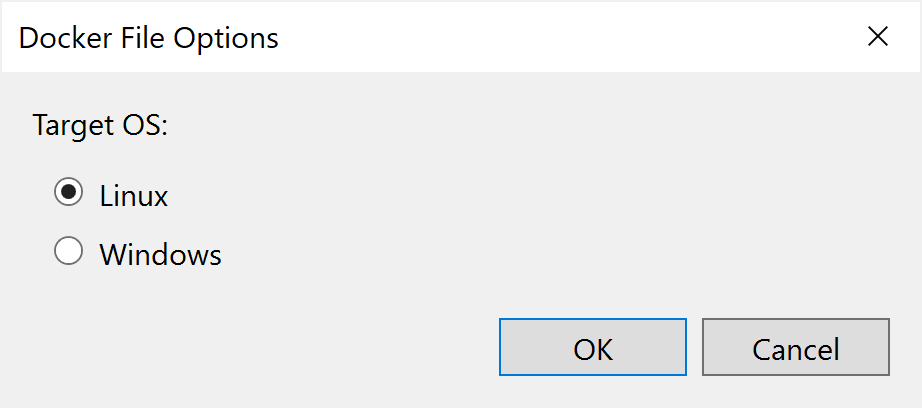
We will use Linux as the Target OS. Click OK. There are some changes to the project:
- A file named Dockerfile will be added to the root folder of the current web app project by VS 2019. The content looks like this:
1 | #See https://aka.ms/containerfastmode to understand how Visual Studio uses this Dockerfile to build your images for faster debugging. |
This is the default Dockerfile generated by VS2019. That is the key of this part.
- It also updates the launchSettings.json file in the Properties folder and this section is added so you can debug the app from Docker:
1 | "Docker": { |
- Another change is VS 2019 added a package named Microsoft.VisualStudio.Azure.Containers.Tools.Targets to the project to enable the functionalities regarding Docker.
- Finally, it added a .dockerignore file. It looks like .gitignore.
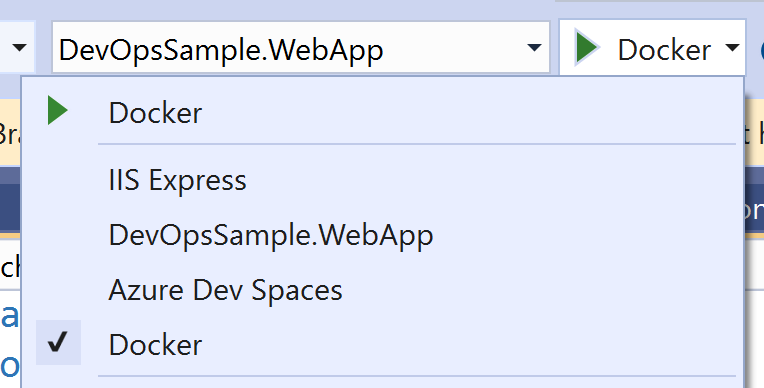
So that you can debug the app in Docker by changing the debug host:
Understanding the Dockerfile
A Dockerfile is a text document that contains all the commands to build an image. When we run docker build command, it will read the Dockerfile and execute the inside commands in a specified context, which is a set of files at a specified location. So there are lots of WORKDIR commands in the Dockerfile, which is used to set up the command context. You can find the documents of Dockerfile here.
Currently, we do not need to change this file much but let’s have a quick look at these commands:
FROMinitializes a new build stage and sets the Base Image for the next actions. In this case, it will pull an image from Microsoft’s public repositories - which is the base image for .NET Core 3.1 runtime.WORKDIRsets the working directory for the subsequent commands. If we use relative path for this command, it will be relative to the path of the previousWORKDIR.EXPOSEsets the ports that will be used to listen for the container. It is TCP by default but you can also specify UDP if you need. In this case, the container will listen 80(for HTTP) and 443(for HTTPS). When we start the container, we need to use thedocker runcommand to map the internal ports to external ports, eg.docker run -p 8080:80, which means the container will listen on port 8080 and forward the requests to the internal port 80.COPYcopies new files or directories from a source position to the file system of the container at the destination position.RUNexecutes the commands on the current image and commits the results, which will be used for the next step.ENTRYPOINTis to config a container that will run as an executable. In our case, it will calldotnetcommand and pass the dll name as the argument to start the web app.
Why the local build failed?
One tricky thing is the COPY command. We should be careful regarding the file path. If you try to build the image in the project folder by using this command:
1 | docker build . |
You may see the below error in the output:
1 | ... |
The reason is when VS 2019 generates the Dockerfile, it creates it in the current project folder, but in the COPY commands, it uses the folder that starts from the root folder of the solution, which is DevOpsSample.WebApp/DevOpsSample.WebApp.csproj. We can change the folder path, or move the Dockerfile to the same level as the solution(.sln) file for the local build. However, that would break the Docker build function of VS2019. I am not sure if it is a bug or something else, but it is a little bit tricky. My solution is to copy the Docker file and paste it to the root folder of the solution, which is helpful for Azure DevOps as well. You can right-click the solution and select Add - Existing Item to add the Dockerfile to the solution level. So VS2019 is able to continue to use the Dockerfile in the project folder for debugging.
So the solution looks like this(there are two same Dockerfiles in different folders):
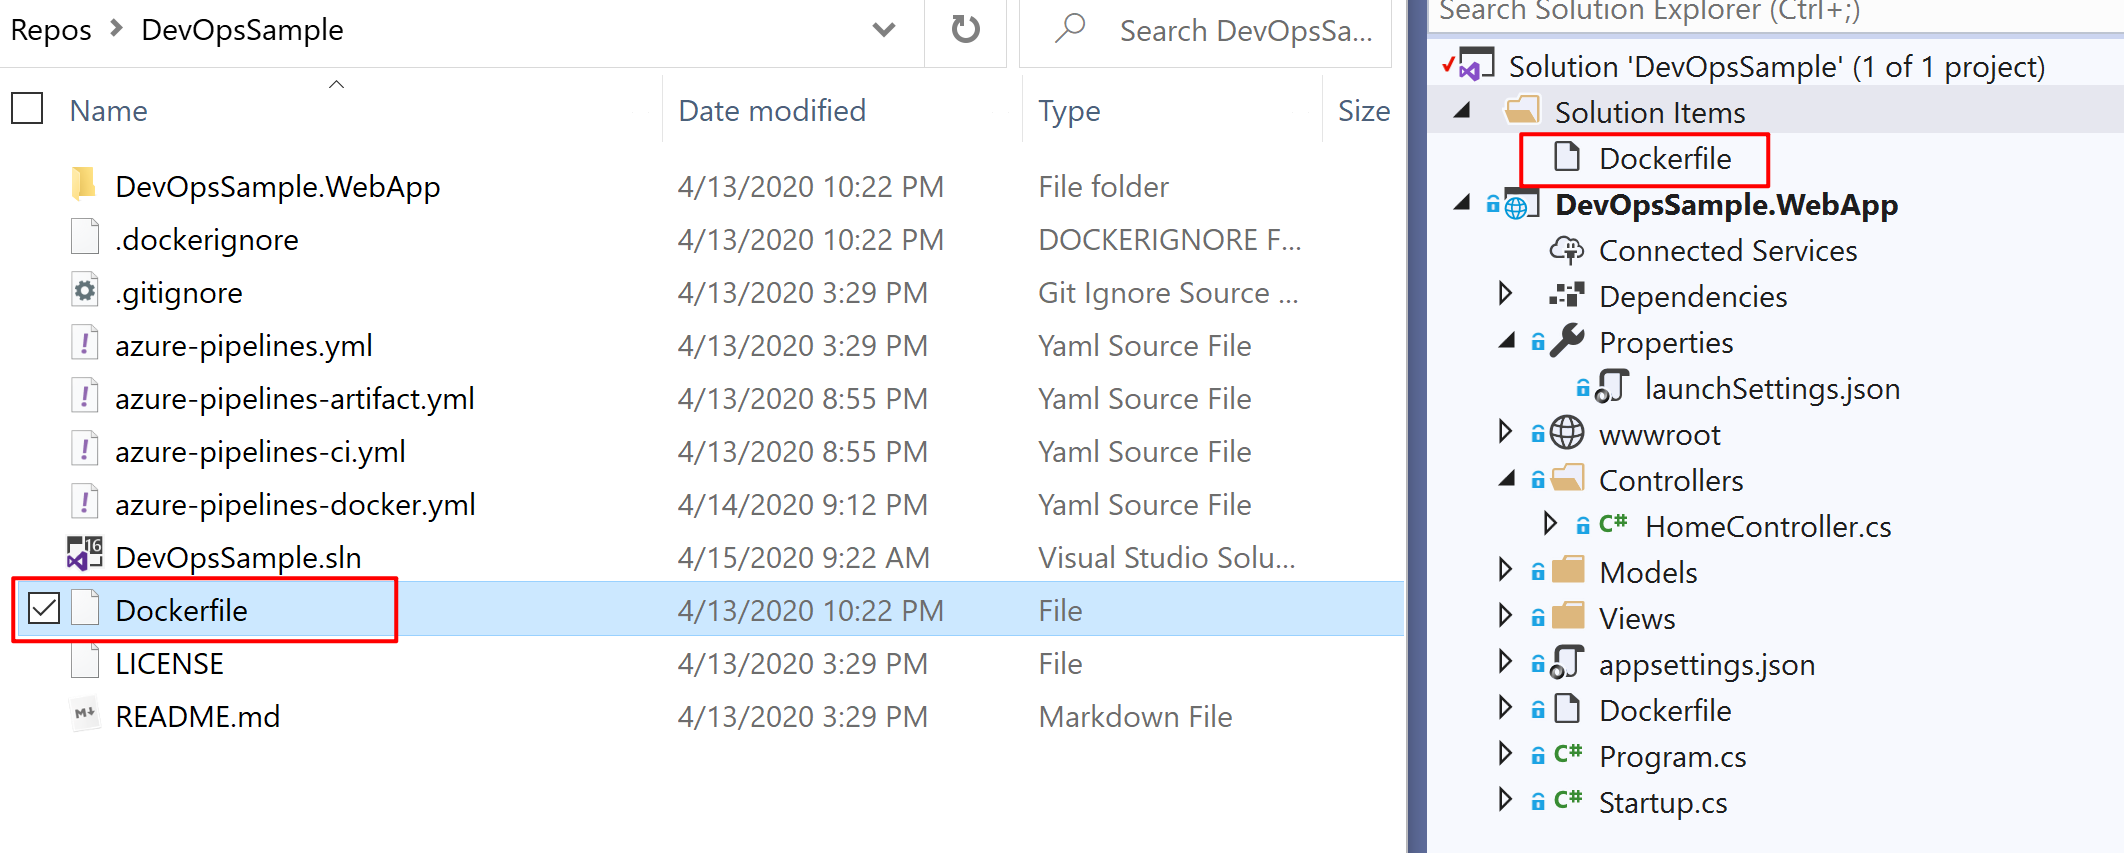
Please be aware of the folder path when you update the Dockerfile, especially when the solution has complex structures and multiple projects.
Creating Azure Container Registry
Before we create the pipeline to build the Docker image, we need to create an Azure Container Registry. You can also use Docker Hub as the destination. For this demo, I will use Azure Container Registry to manage the images. We will use Azure DevOps Pipelines to build the image, then push it to Azure Container Registry so that we can use the pipeline to release it to Azure Web App for Containers.
You can use Azure Portal or Azure CLI to create Azure Container Registry. For more detail:
- Quickstart: Create a private container registry using the Azure portal
- Quickstart: Create a private container registry using the Azure CLI
ACR is not free but the price for the Basic tier is affordable for dev/testing.
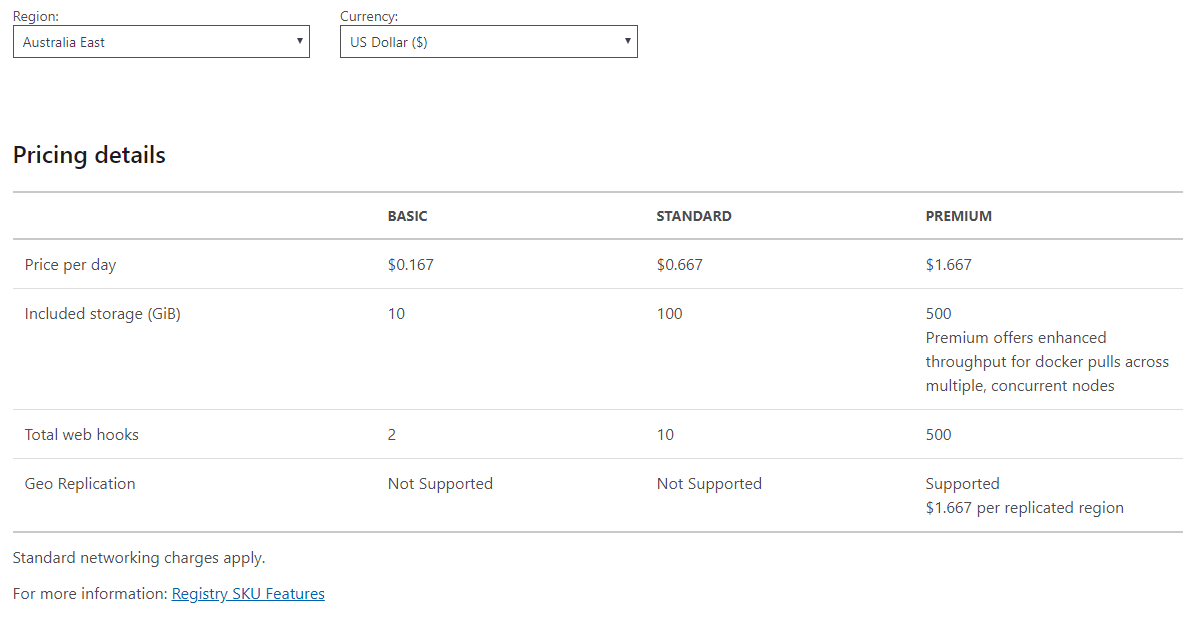
I have already created an Azure Container Registry in the Azure Portal. You can select Basic SKU for testing.
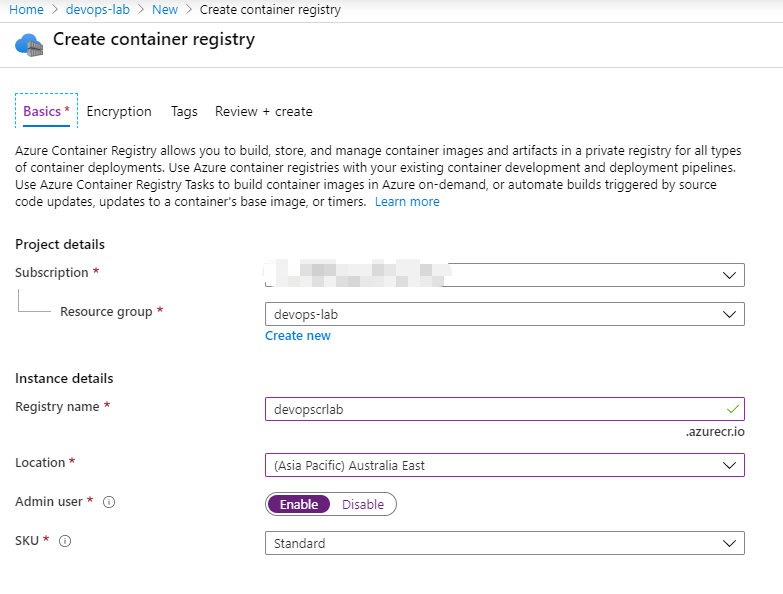
Once you created your Azure Container Registry, you can find the server name in the overview page. It is like youracrname.azurecr.io.
Creating the build pipeline to build the Docker image
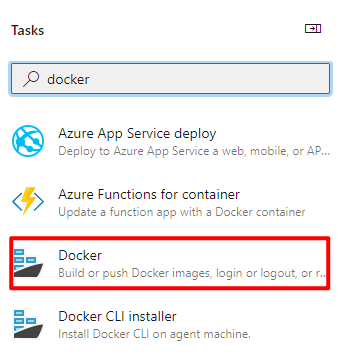
The next step is to create a build pipeline in Azure DevOps. But this time we will use another task. Search docker in the assistant and select Docker task:
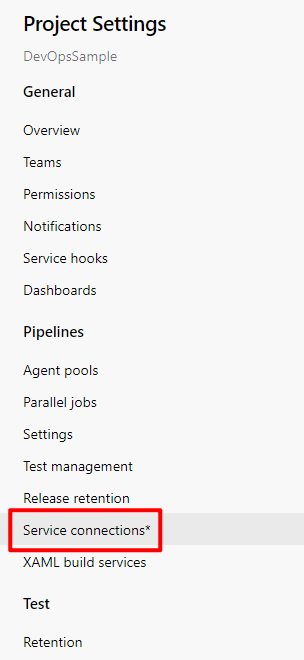
If you cannot find available Container registry on the configuration page, you need to add a server connection for your project. Open the project page and click Project settings on the left bottom corner to navigate to the Project Settings page. Then click Service connections:
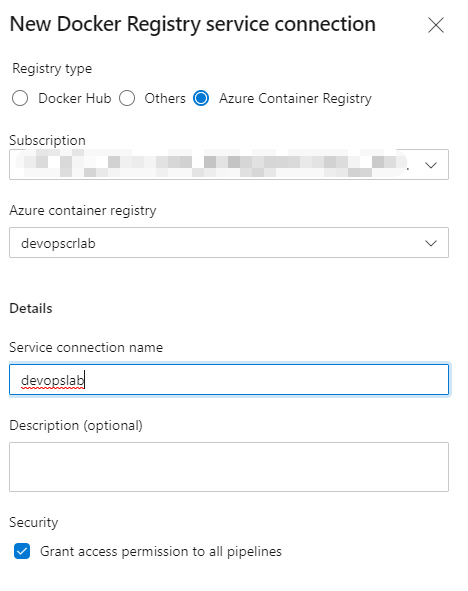
Click New service connection on the top right corner and select Docker Registry. On the next page, you need to select the proper Azure Subscription and authorize the access, then select the correct service connection:
Now return to the pipeline page, you will see the Container Registry:
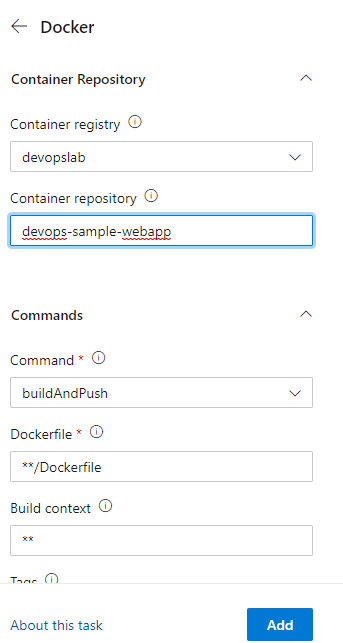
Create a name for your container repository. We will use this name in the release pipeline. Keep the default values for other options:
- Command:
buildAndPush. - Dockerfile:
**/Dockerfile - Build context:
** - Tags:
$(Build.BuildId).
Click Add to add the task. Change the YAML file name as azure-pipelines-docker.yml. So the pipeline looks like this:
1 | pool: |
But do not run right now. Because there are two Dockerfiles in our solution. So we need to specify the correct Dockerfile in the root folder of the solution, not the Dockerfile in the web project.
Also, we need to specify the Build context. The default value ** for build context specifies the directory that contains the Dockerfile. The situations may vary depending on your solution structure. Of course, you can modify the Dockerfile content directly. You can edit a Docoker file for the pipeline, another for the local VS2019 build task. You can even change the file name of the Dockerfile. All the configurations are up to you. Just keep in mind that you need to use the correct path for the Dockerfile and the build task. Otherwise, you may encounter the error no such file or directory when the task copies files.
It is a good practice to specify the tag for the image. It is like an aliase of the Docker image. Currently, we just use $(Build.BuildId) but you can also use semantic versioning.
For this case, the final task section in the YAML file is shown below:
1 | - task: Docker@2 |
I use the system variable $(System.DefaultWorkingDirectory) to specify the buildContext as the solution folder. The value of Dockerfile is $(System.DefaultWorkingDirectory)/Dockerfile, which specifies the Docker file in the root folder of the solution.
Now we can run the pipeline. If you see it succeed, return to your Azure Portal and click Repositories of Azure Container Registry then you will see it:
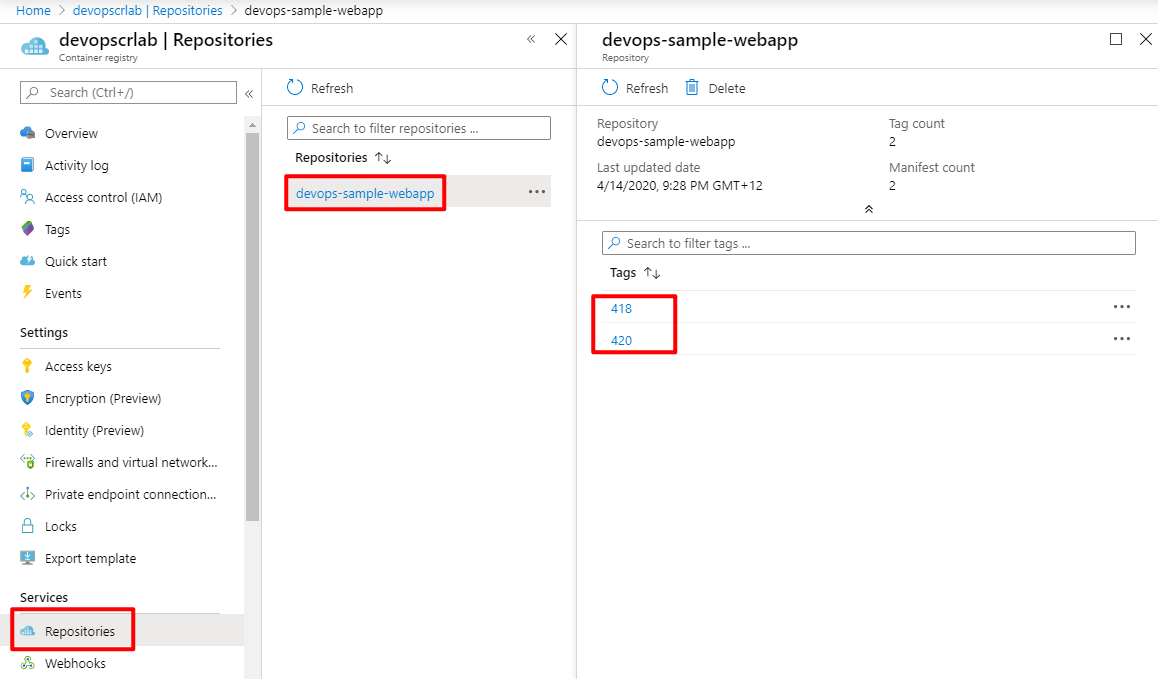
That means the pipeline has successfully built and pushed our web app to Azure Container Registry! Every time we run the pipeline, it will build a new image with a tag and push it to the registry. You can change the pipeline to use the other build number policy.
Creating the Web App for Containers
Next, we need to create two instances of Web App for Containers, as we did for Web App on Linux. One difference is that we need to configure the registry credentials for the container registry:
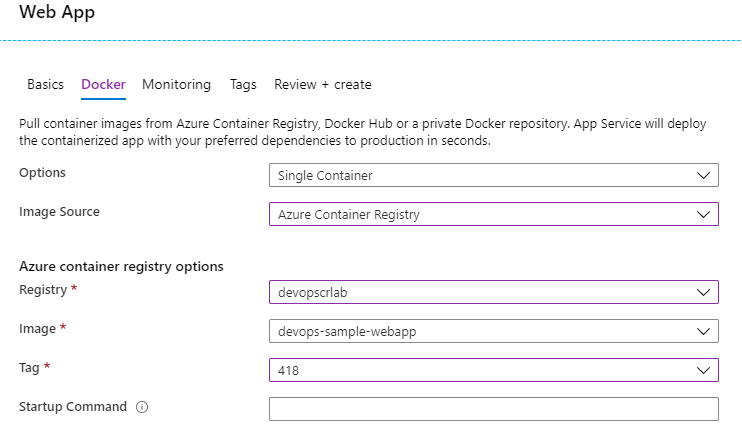
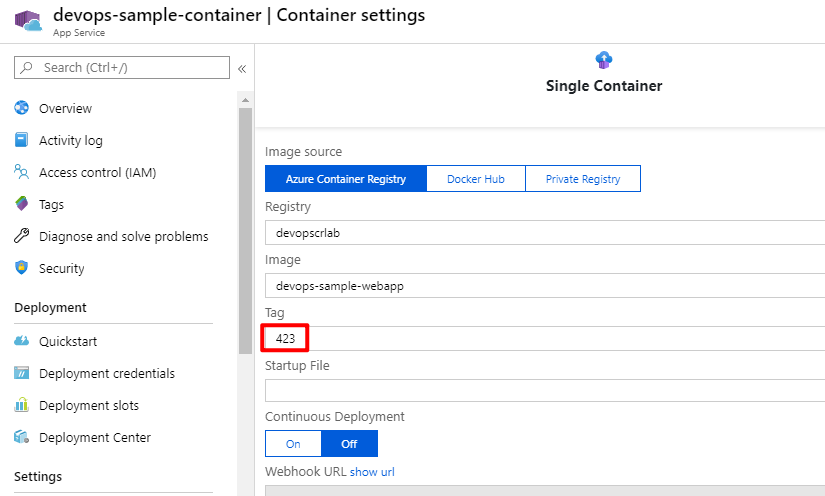
You can change it later in the Container settings:
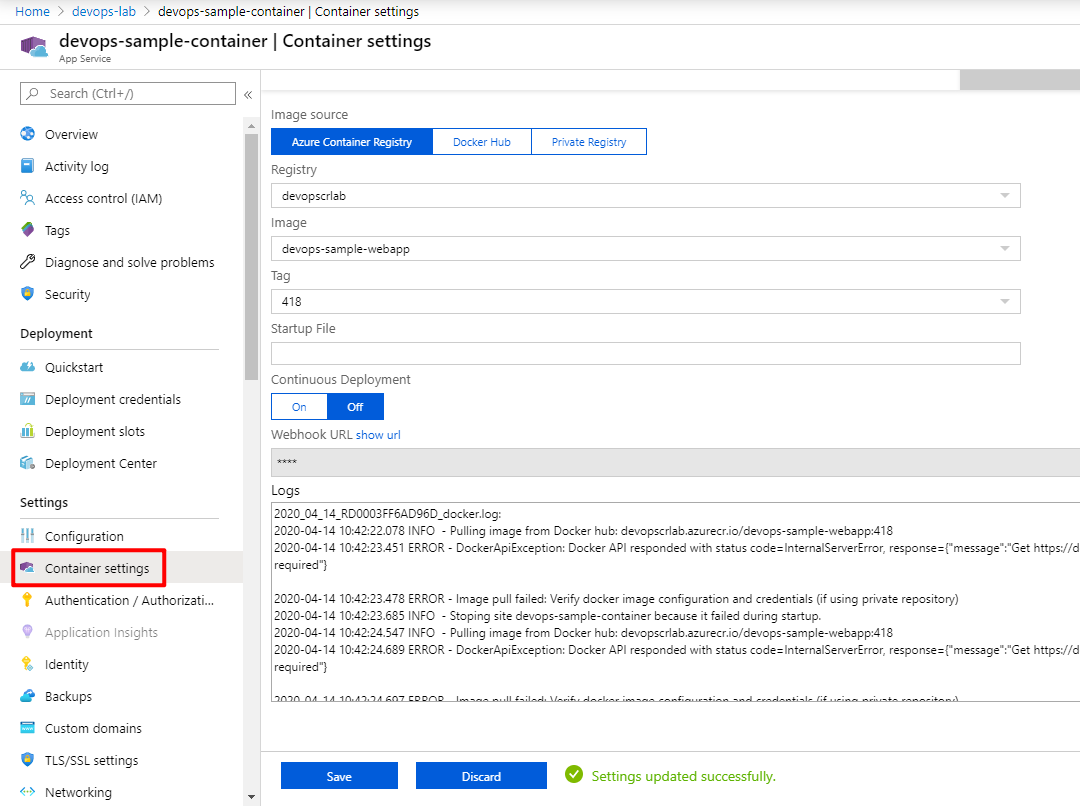
For now, the Tag is 418. We will use the release pipeline to update the image.
Once we config the Docker image, it will pull the Docker image and complete the first deployment. But because we did not inject the environment variables for the Docker image, so the app is using the dev appsettings.json.
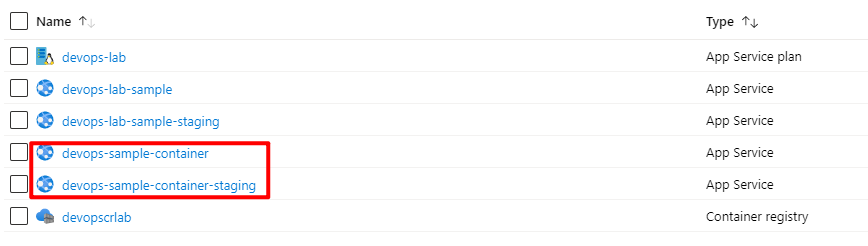
In the Azure Portal, Here are my Web App for Containers instances:
Feel free to enable the deployment slot feature if you select standard or higher tier.
Creating the release pipeline for Container
There are two easy ways to run the container. Click the three dots of each container and you will find two options - Run instance and Deploy to web app:
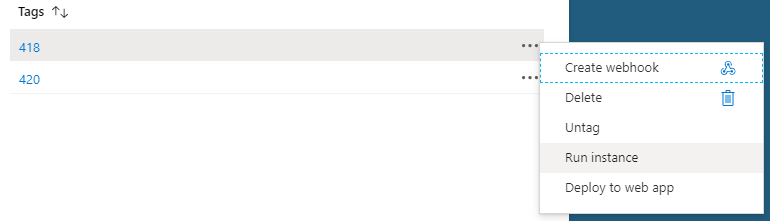
If you use Run instance, actually you would create another service called Container Instances. For more detail: What is Azure Container Instances?. That is not the key point of this article. For this case, we will use Azure DevOps Pipelines to publish it.
So let’s create another release pipeline. The steps are quite similar to the previous section. We still use Azure App Service deployment task. But for the artifact, we will use Azure Container Registry:
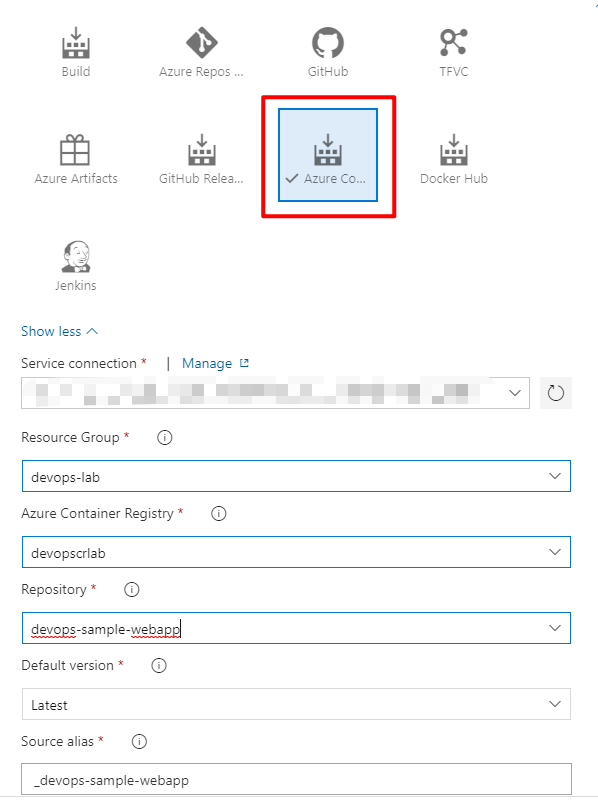
Select the correct repository for the release.
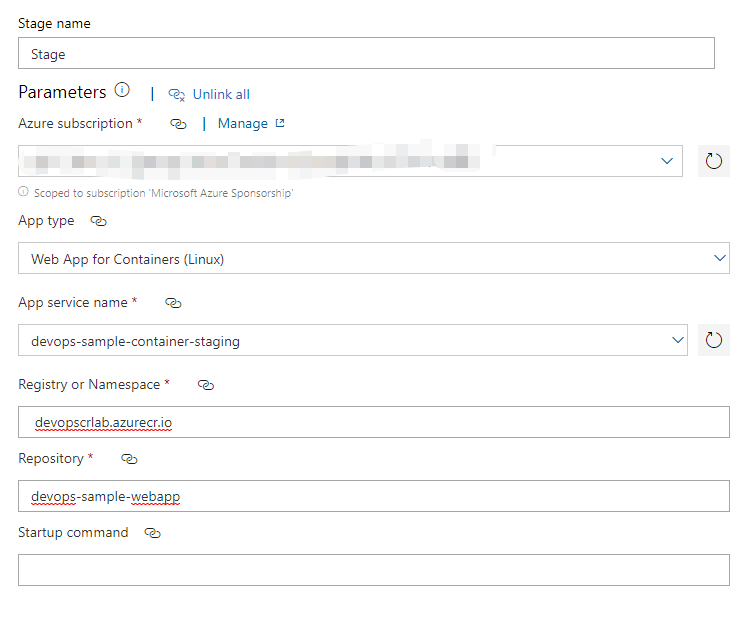
When you config the deploy task, you need to select Web App for Containers(Linux) as App Type, and specify the Registry or Namespace, which is the login server you saw on the overview page of your Azure Container Registry. The Repository is the name you configured in the build pipeline a moment ago. My configuration is shown below:
Injecting the values for appsettings.json
When we build the Docker image, we did not change the values in the appsettings.json file. It is time to inject them in the release pipeline. How would we do that?
This time, I will show you how to use the Application and Configuration Settings section to replace these values. The tricky thing is that the variable syntax for Linux container is quite different.
Click the Deploy Azure App Service task in the release pipeline, we will see a Application and Configuration Settings section. We can edit application settings or configuration settings here. Click the three dots button for App settings. You will see an edit page that you can add some key-value pairs. The rules are:
- If the key is non-nested, like MyKey in our demo, use the same name as the key, eg.
MyKey. - If the key is nested, like Title in Position, use double-underscore
__to separate them, eg.Position__Title. - If there are spaces in the value, use quotation marks to wrap the value, eg
"My appsettings.json Value".
Did you find the difference? When we created the variable groups, we used syntax like Title.Position for nested JSON objects, but here, we need to use __.
IMPORTANT:
In a default Linux container or a custom Linux container, any nested JSON key structure in the app setting name like
ApplicationInsights:InstrumentationKeyneeds to be configured in App Service asApplicationInsights__InstrumentationKeyfor the key name. In other words, any:should be replaced by__(double underscore).For more, please see https://docs.microsoft.com/en-us/azure/app-service/configure-common#app-settings.
Thereby, we have quite a few different ways to represent the nested key-value pairs:
- In ASP.NET Core Apps, we use
_configuration["Position:Title"] - For variables of Azure Web Apps, we use
Position.Title - For Azure Web App for Containers, we use
Position__Title
We have already created the variable groups in the previous section so this time we just reuse them. However, we need to specify the key names. So the configuration looks like this:

Because we already applied quotation marks for the variable values in the variable groups, so no need to use "" here. Also please do not forget to link the correct variable groups and specify the scope. If you got an error like this:
1 | [error]Error: Failed to update App service 'devops-sample-container-staging' application settings. Error: BadRequest - Parameter name cannot be empty. (CODE: 400) |
Please check the variable values and make sure there is no duplicated "" for the values.
Create another stage for production and add the correct variable groups.
Deployment
Now it is time to deploy them. Create a new release then deploy to two stages. Usually, we should run tests and have some approvals before deploying to each stage. This is just a demo so we deploy them at the same time. When the deployment is done, you can see the Tag has been changed to the latest build version:
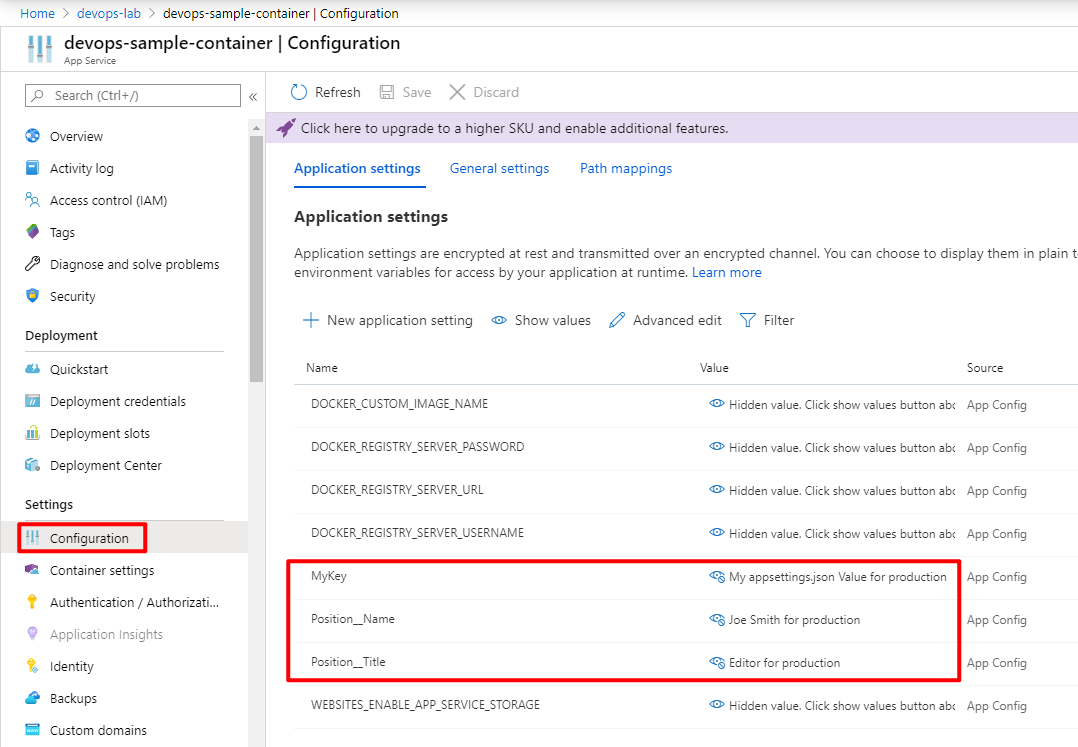
If you check the Configuration, you will see the variables have been updated:
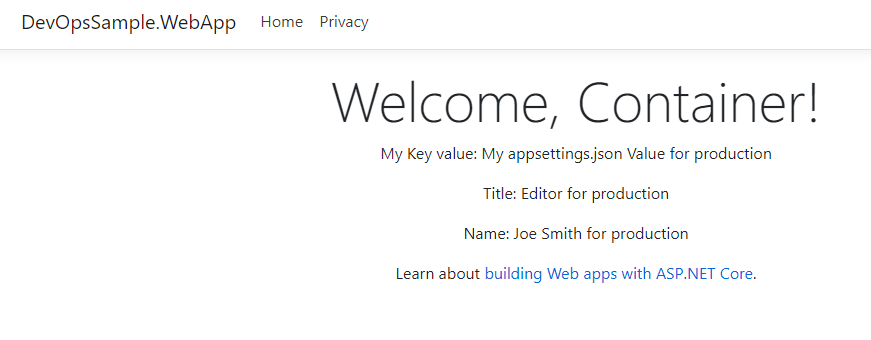
Then check the web site, you will see the variables in appsettings.json have been updated for the correct environments:

All done!
Summary
In this article, I demonstrated how to deploy the ASP.NET Core Web App to Azure App Service - Web App on Linux and Web App for Container. The key is how to inject the variables of appsettings.json for different environments. We have learnt how to use File Transform task and the built-in Application and Configuration Settings of the deployment task to replace the variable. The reason why we build one artifact or Docker image for multiple environments is we should always keep immutability for the artifact/Docker image. If you build environment-specific images, it might cause some issues. And we should not store the sensitive data in the Docker image, such as the database connection string. That is why we inject the values in the deployment process.
The important thing here is we need to specify the key name because there is a various syntax for different platforms. If you get something wrong when you build the Docker image or replace the environment variables, I hope this article would be helpful. Thanks for reading.